
|
|
#286
 March 26th 2012, 02:38
|
|||
|
|||
|
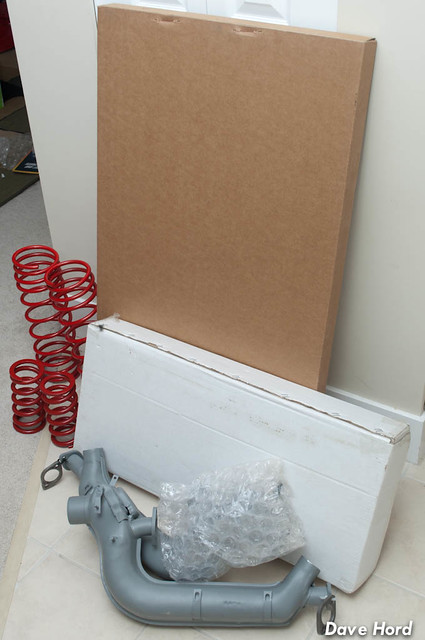
Based on these pics, your report of how good the company is Dave and other bits and pieces I have read, I'm definitely putting a Vintage Speed exhaust on my shopping list. It's just decisions on which one to have!

|
|
#287
March 26th 2012, 02:48
|
||||
|
||||
|
Yeah, I can't wait to hear it! Will have to fire up some video for sure.
Well, it's been a long weekend of ups and downs...but progress is certainly happening. Friday I finally cleaned out the car and the garage enough to get it on it's wheels for the first time. It was a good moment, quickly followed by the realization that it was going to be a bad moment. The 300lb springs that I selected are _waaaay_ soft. The car was lowered dry with no engine, no seats, no doors and only one piece of glass. The rear suspension still sags through half of it's travel. Bumping the preload up gains a bit, but they're very clearly too soft. Initially this wouldn't seem like a big issue, I mean they're coilovers...buy another set and swap them in! That's the whole idea. Problem, though, is that I'm already tight for clearance. Each heavier spring will be thicker, and thus cut down on my clearance. Will see what the rally shop has for springs that can be borrowed for static rate testing. I'm going to lower the front a few inches and see if I can find a happy summer setup for testing and actually dialing in the suspension on the car. Too early to panic, but late enough to realize I have a bunch of work ahead of me! 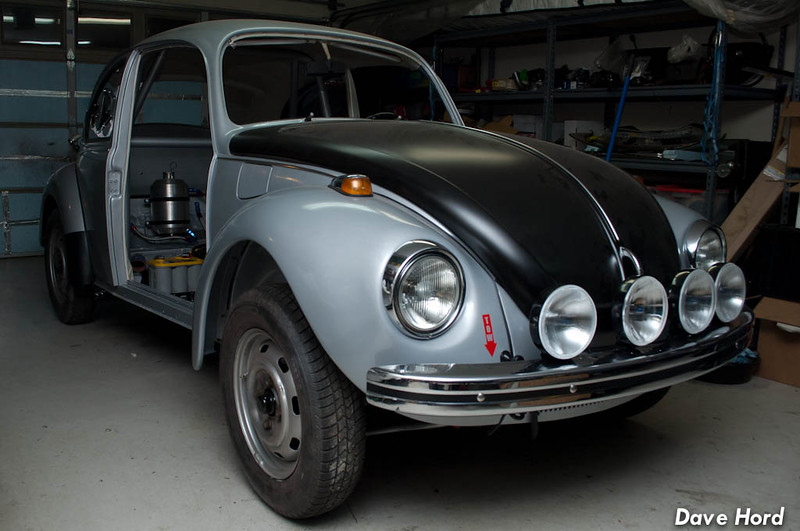 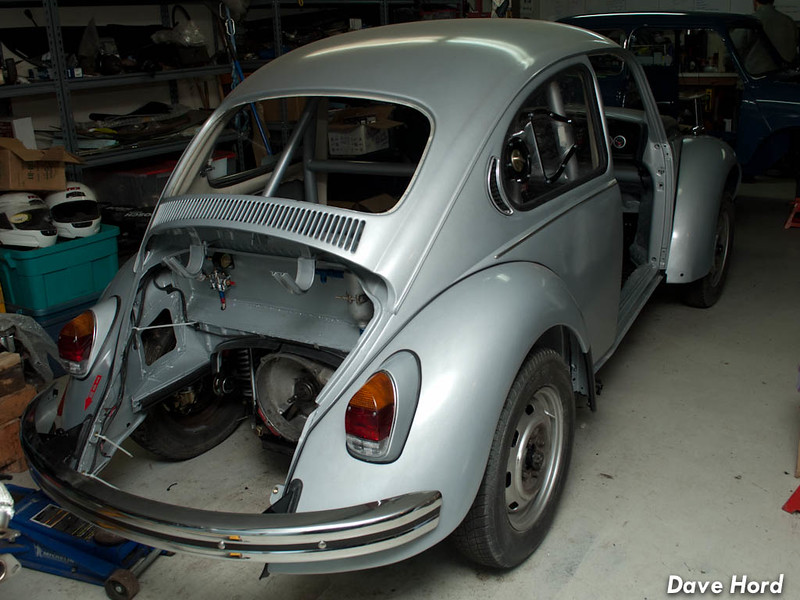 With car on the ground, and tonne of sunny weather for the weekend, I realized it would be the perfect day for a drive. Hmmm, can't drive the car. So, trailer it! 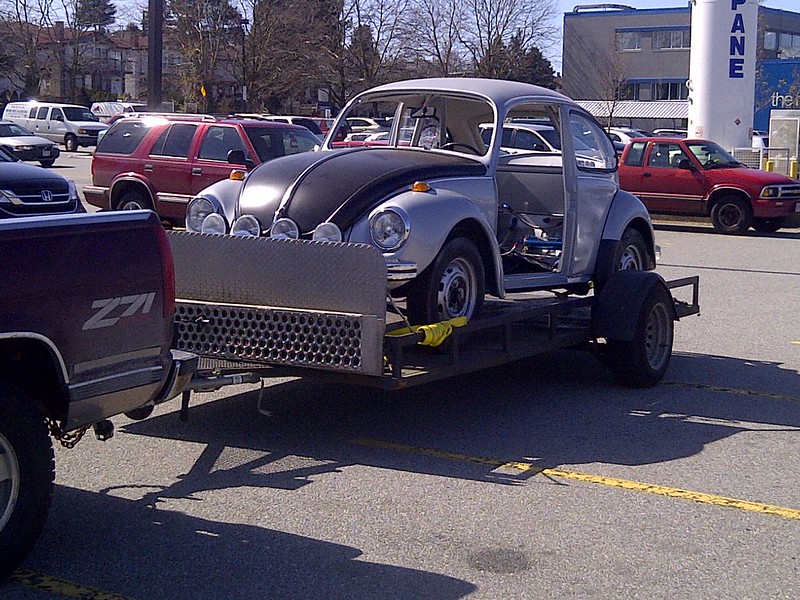 Okay, well, that isn't the full story. I actually the car back down to Chilliwack to GLI Autoworks. Lorne and Gerry have been storing the doors for me while I work on the car, and I've been waiting for the rain to stop long enough to get the car down there. While they mounted the doors, Art from AVR brought out "the magic rope" and helped Rob and I to install the rear window. The front windshield was popped in almost before I noticed, and things were just trucking along. It was team affair as we installed seals, chrome trim and the vent windows...mostly done by Lorne and Rob if I'm honest...but I did a good job of stealing spare parts from their personal garages and the shop to replace stuff that I've lost in the shuffle  Rob and I finished the door latches by heading to their family farm to 'borrow' more parts from the company parts cars. With it getting dark I hit the road for the 2.5 hour drive home. Rob and I finished the door latches by heading to their family farm to 'borrow' more parts from the company parts cars. With it getting dark I hit the road for the 2.5 hour drive home.  Today I started by finishing off the doors. I can officially state that I hate U-Channel felt. I've hated it for some time, if I'm honest, but always thought it was because the '69 one-piece windows used iffy aftermarket felt. Nope. I think U-Channel felt just sucks in general. I'm sure there is a trick to getting it all nice and even, without looking like a wavy boat, but after longer then I care to admit I decided to accept it for now. You can only remove and reinstall it so many times before you wish for a convertible! I finally remembered how to get the glass back in, and the regulators are...um...acceptable. I'll be scouring swap meets this year for a good pair of used regulators. To his credit, Rob told me to wait until I had a good pair of used ones! Door panels come in this week, and when they do I will do the plastic on the doors and finish them up. 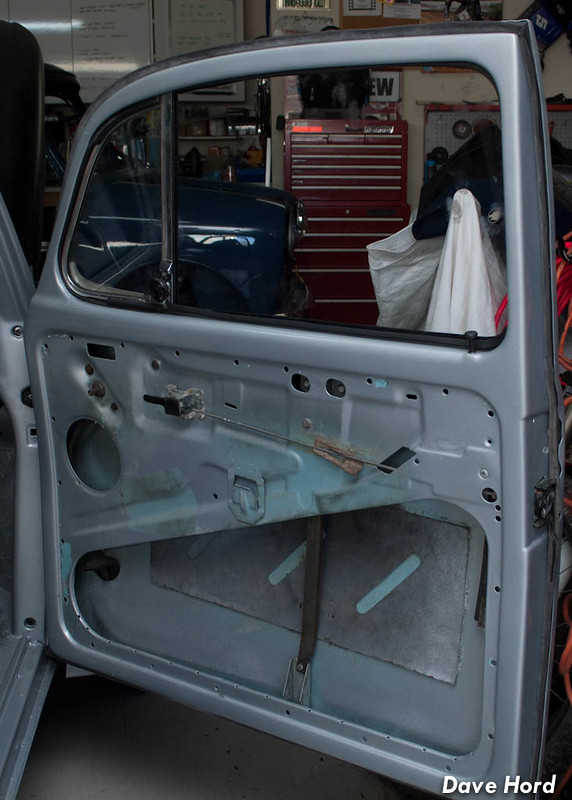  With the doors as finished as I can make them, and my fingers raw from all those stupid clips and stuff, I figured I would go back to prepping the engine and car for some power. Oil filter adapter has been replaced, which seems like nothing mentionable...except all the interior oil lines are finally 100% finished. 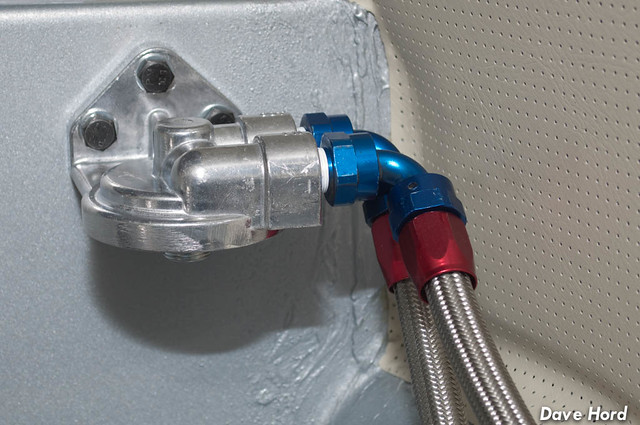 Russell fittings had a fuel bulkhead fitting (670860) that ships with two teflon washers and a lock nut. On the '69 I used barbed fittings and standard rubber hose for the valve cover vents, and it was always a pain. Fitting the valve cover for AN fittings, though, was definitely an afterthought on my part. Found this fitting at my local auto parts store, and sure enough it works no problem. I'll need to run the engine around the clock once I have a crank pulley back on, but with #1 at TDC the fitting is clearing the valve springs/rocker/etc. And hey, if it ends up interfering...I'll just cut it down :P 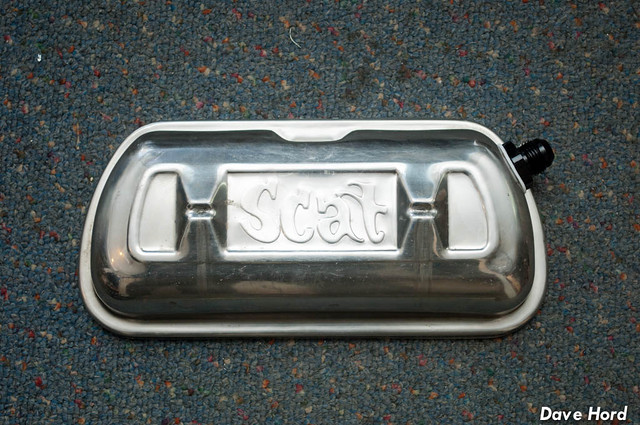 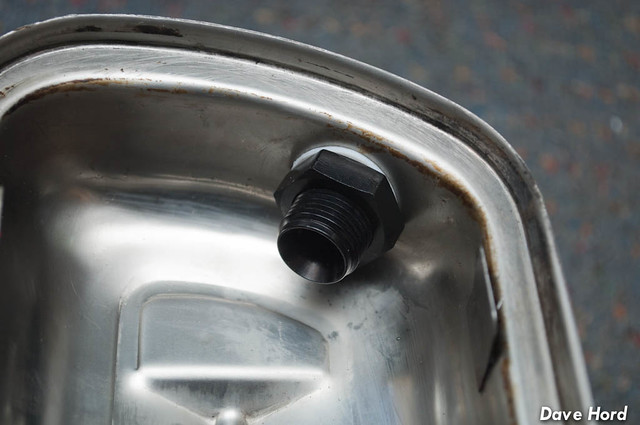 Before I went down for the doors, Rob and I were talking about the list of things I needed to get the car running and how that differed from the list of things I needed to finish the car. After counting the number of engine pulls I was planning Rob put together a bit of a surprise pack when I arrived at the shop. That plan about pulling the motor later for carbs? Yeah, lets just do that now. 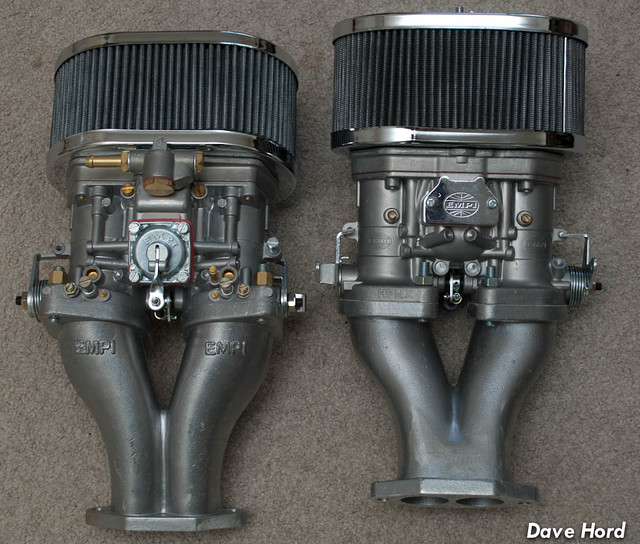 So my late afternoon / evening was spent pulling the carbs down and blasting out the passages...then reassembling. The engine was stripped, and my "Salzburg" style shroud installed. I keep looking at it knowing it's just such a quick hack job, but everything I've seen/read about the factory cars was the same. I'm torn on it for now, but could re-do it down the road. Warwick was working on his mini and just laughed at me. "When the engine is the in the car, you're never going to notice" Hmmmmm.... 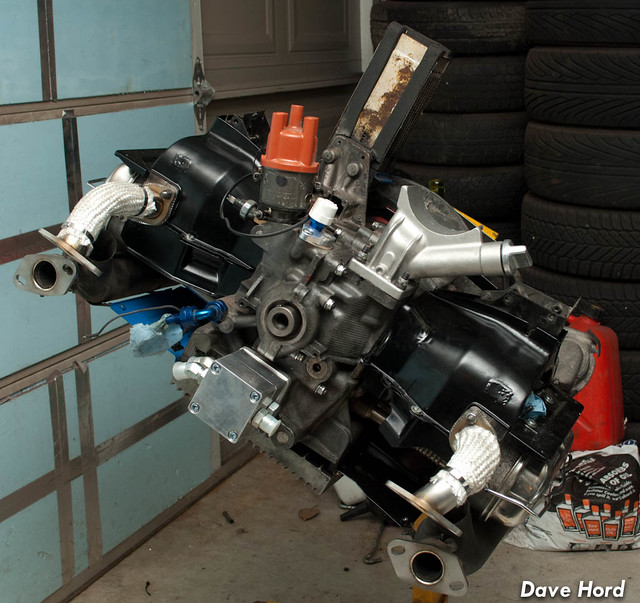 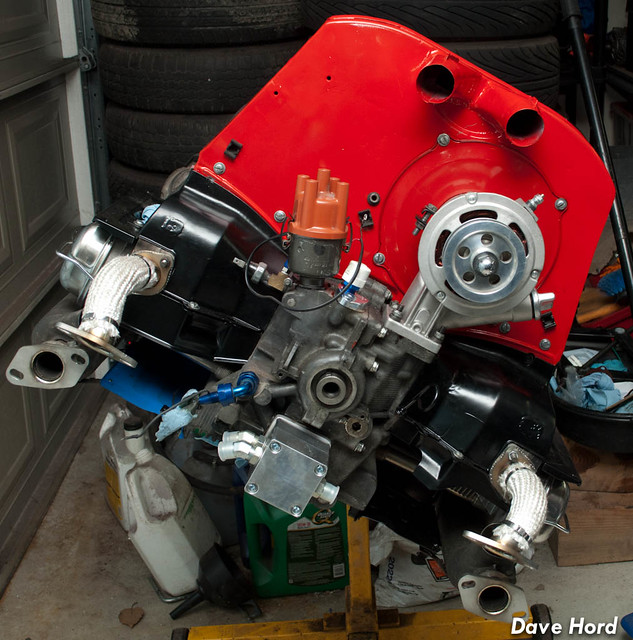 Having never done a hex-linkage before, man is there a tonne of little parts eh?! I did have to shorten the hex bar a little, which I knew was a possibility. A quick zip over to my buddies lathe and I was back on track...I thought. As soon as I had the length right I discovered it interferes with the Alternator strap. Had I left the strap stock, no problem, but the powder coating added *just* enough to the piece that the hex shaft was hitting it. A quick trip back to the lathe and I've got it clearing. 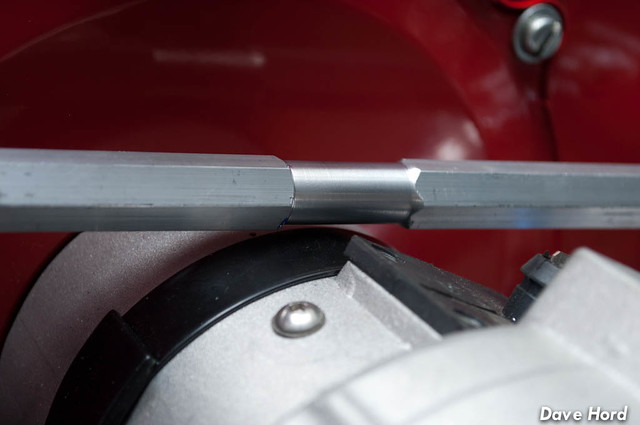 Still have some work to do before it's ready to pop back into the car...but I'm starting to feel like I can see a finish line ahead. 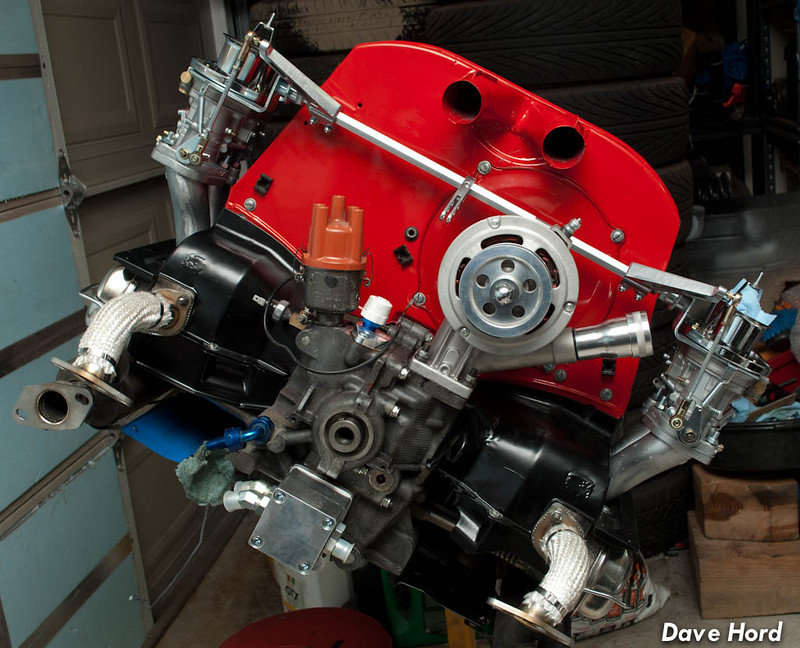 -Dave
__________________
'71 Type 1 - Rally Project '58 Type 1 - I bought an early!?! '73 Type 1 - Proper Germanlook project '68 Type 1 - Interm German 'look' project '75 Type 1 - Family Heirloom '93 Chevy 3500 pickup - Cummins Swap
|
|
#289
March 26th 2012, 13:44
|
||||
|
||||
|
Quote:
I will be running a sway bar, but I haven't installed it yet. I wanted to get the spring rate close, and then put the bar on. Txt me at 604 849 0076 if that's easier? -Dave
__________________
'71 Type 1 - Rally Project '58 Type 1 - I bought an early!?! '73 Type 1 - Proper Germanlook project '68 Type 1 - Interm German 'look' project '75 Type 1 - Family Heirloom '93 Chevy 3500 pickup - Cummins Swap
|
|
#291
March 27th 2012, 04:29
|
||||
|
||||
|
So when I went to the shop tonight I thought to myself "I'm going to get the engine back in"...heh heh, yeah right. I started off by taking care a couple of details, and they snowballed and snowballed until all I had done was deal with details. The problem with details, is they take so freaking LONG!!!
First up, was mounting the coil. Should be simple, but the fuel-pump block off plate I'm using isn't flat. That left an angled gap right around the center of the photo below. Technically the hole doesn't matter, as the case is sealed by the gasket and plate...but should it fill with dirt and crap it could get into the case if I ever remove the plate: 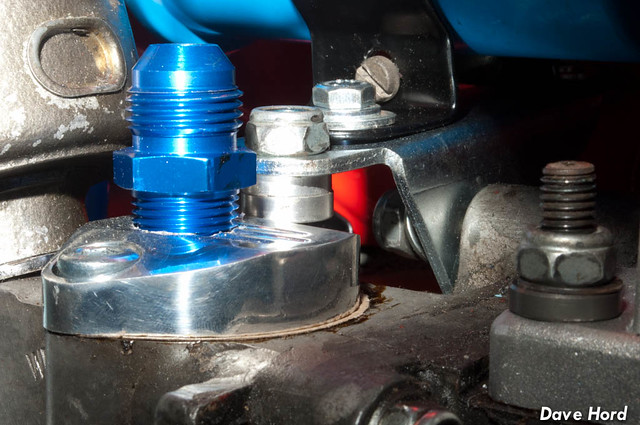 Eventually I determined a grommet would take up the space and ensure that a good seal was made. With that, the coil project was done.  So up next, I trimmed engine tin to fit around the pump. Just a 'slight' bit of trimming required :P   With that, I moved onto oil-tank cut-off valve. For whatever reason I had always planned on mounting this below the car, even though it would be incredibly annoying. I was having difficulty deciding where exactly to put it, so I asked Mark Huebbe to send me a photo of his. He's got a Beetle that he rallies in the Rally America series. As soon as I saw his placement it was like a bell went off. Why didn't I think of putting it in the engine bay!?!  The valve, fittings and line are all very close or touching the tin. I am concerned about the potential heat factor and was thinking of possible solutions when it dawned on me. Vibrant Performance recently started carrying a new line of thermal products, so surely they would have something that would work? A quick phone call, even though it was 11:30pm, and I should have the required stuff coming by mail tomorrow. Gotta love good connections! Getting this to fit correctly required pulling off the pulley tin, yet again. I think that was probably the fifth time this evening alone. The worst part is I will still need to take the whole motor down to the point where I can take off the cylinder tins...in order to install a bolt for mounting the valve! I think I'm going to get lucky on the feed line, though, as I should be able to use the factory hole for the reverse lights to pass the oil line through from the tank to the valve. I'll confirm as soon as the engine gets remounted in the car...if not, another bulkhead will go in near the right-side carb.  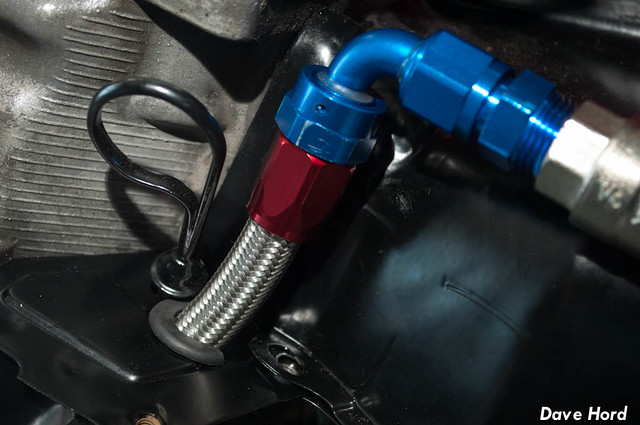 I then moved on to the breather system. I mounted up my second breather tank, removed all the lines and fittings from the first tank and then started reworking the whole system. Once I had it about halfway ready, I realized that I really needed to raise the one breather by about a half inch. With it already touching the top of my firewall, that wasn't going to be a simple task! Yet another detail to find a solution to... 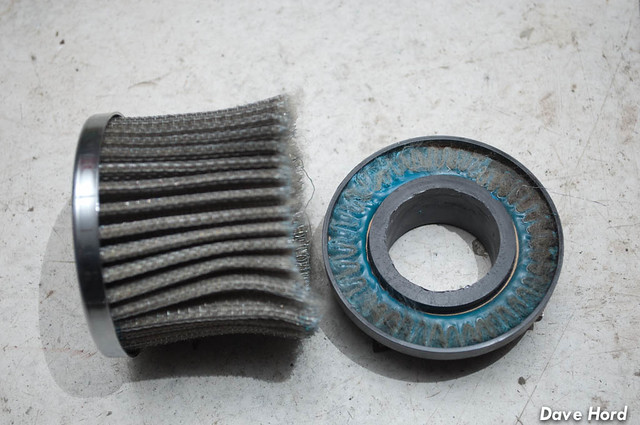 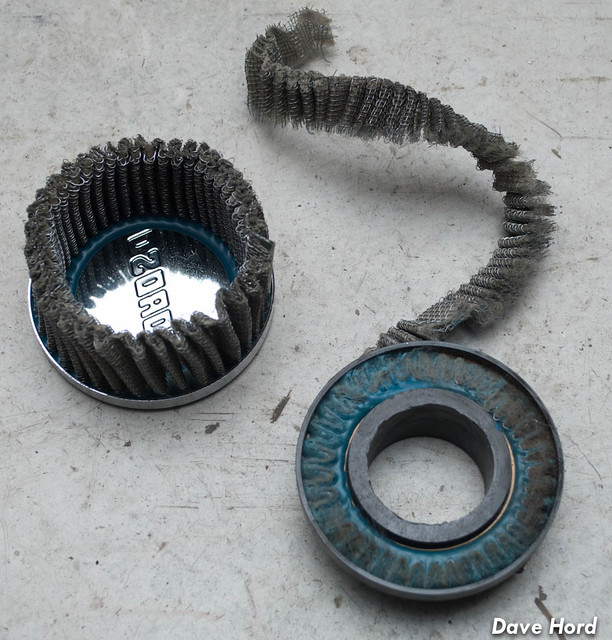  With my new resized filter, everything fits exactly how I had imagined it in my head. Full sized filter on the right, shortened filter on the left. 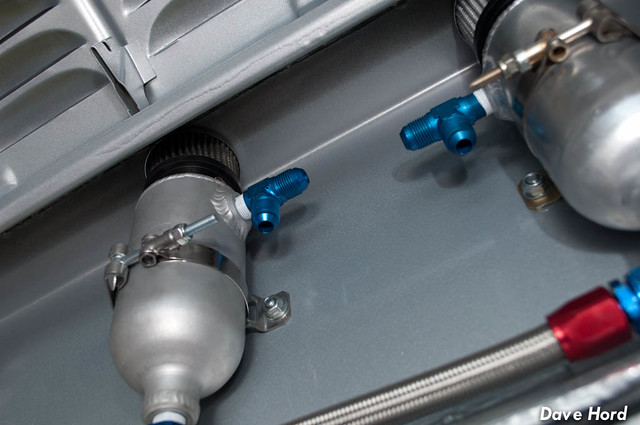 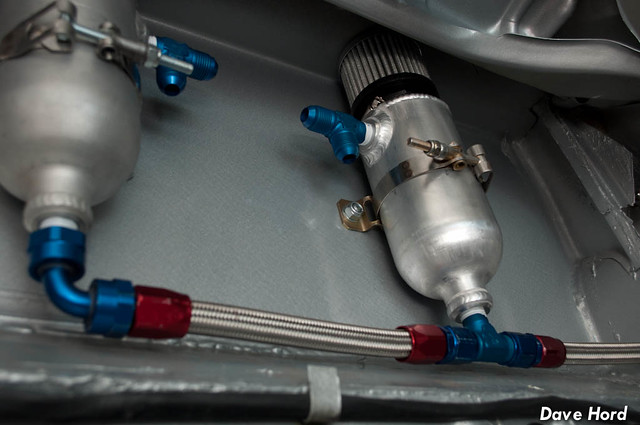 Breather line for the tank was then added through the firewall, and now the system is ready for the engine install. I should be able to disconnect the breathers easily with a stubby wrench, but I'll need to get the engine in to be sure. Add another item to the "check this" list! 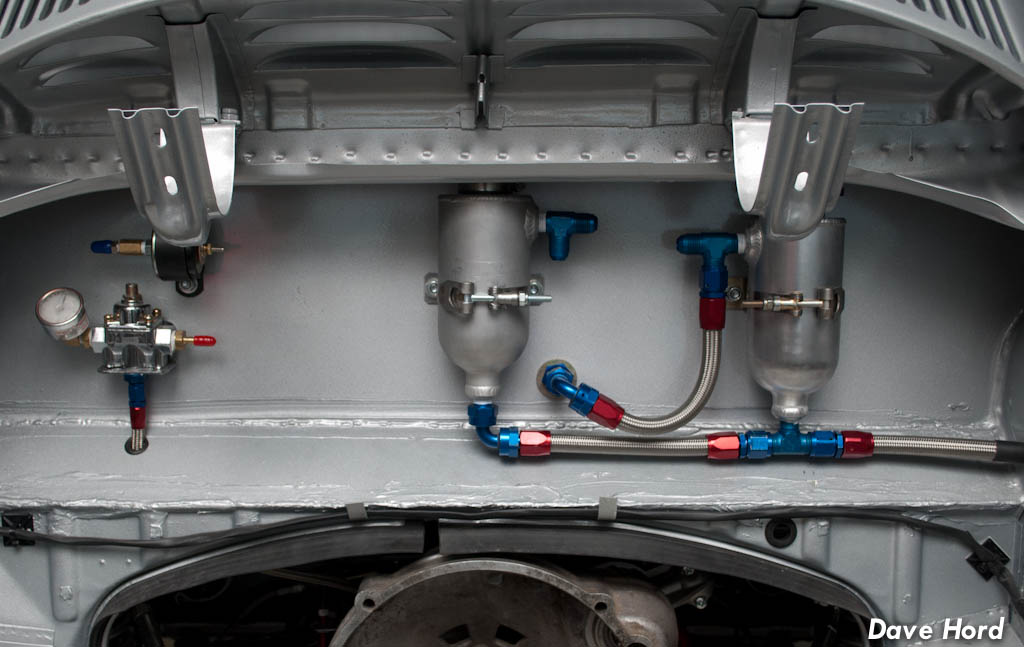 Somewhere in the middle of all this I found myself sitting in the back of the car, probably tightening up a fitting or two, and realized that I could pop in a fuel filter and finish the fuel connections by the frame horn while I was there. Fuel system is now connected from the tank all the way to the regulator. No photos, it's just a filter ziptied to the speed sensor bracket! It was about this point in the late evening that I realized I should begin tearing the motor back down. The garage, however, is a complete disaster with tools everywhere. I took a step back, thought about where to start tidying up, and then realized that would make a far better lunch-break project tomorrow during the work day. Besides, it was midnight and I still hadn't eaten dinner! I'll clean up the shop at lunch, and then be ready to start fresh at the end of the work day. Carbs off, motor in, oil-lines and breather lines completed. That's the goal for tomorrow...bonus points if I get the carbs back on :P -Dave
__________________
'71 Type 1 - Rally Project '58 Type 1 - I bought an early!?! '73 Type 1 - Proper Germanlook project '68 Type 1 - Interm German 'look' project '75 Type 1 - Family Heirloom '93 Chevy 3500 pickup - Cummins Swap
|
|
#292
March 27th 2012, 05:07
|
|||
|
|||
|
You sir are a chieftain. Perhaps borderline crazy but the results are paying off
Cutting down the filter is pure madness and a proper engineering solution. Between you and Ricola a new benchmark is set for beetles
|
|
#293
March 28th 2012, 05:08
|
||||
|
||||
|
Thank you for the kind comment. I never set out to be this detailed, but it kinda grows on you. Once you start, you can't stop! I think I'm way past borderline crazy though, I've definitely hit certifiably insane
Started off this evening by stripping off the bolt-on oil sump (Good Riddance!!) and returning the pickup/cover to factory spec. I was considering tearing the whole motor down to get to the cylinder tins when I realized there wasn't enough room between the tin and the head fins for a bolt head anyhow. I really shouldn't be allowed to powdercoat my tin...I grind, cut and weld on it _after_ powdercoating! :P I'm pretty sure I'll be able to put the heat-shielding in while the motor is in the car, so I'm not going to wait around for it to arrive. 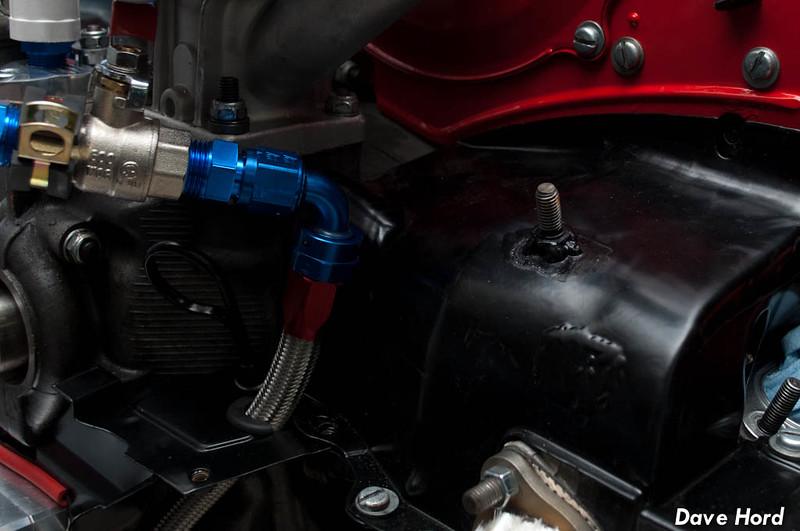 I had to wait around a bit to get a hand lifting the motor off the stand (the one thing I can't do solo). So in the meantime, I prepped the oil lines. Thankfully I was planning ahead when I had the motor in the car the first time, and had pre-measured the lines. I also made notes about where I would need heat shielding or other protection. So basically I just had to follow my own instruction sheet! The heat shielding is relatively obvious, but the other shield is simply left-over Flextech from the wiring harness. These two lines pass really close to a number of electrical connections so my hope is that this will keep them from rubbing through anything. 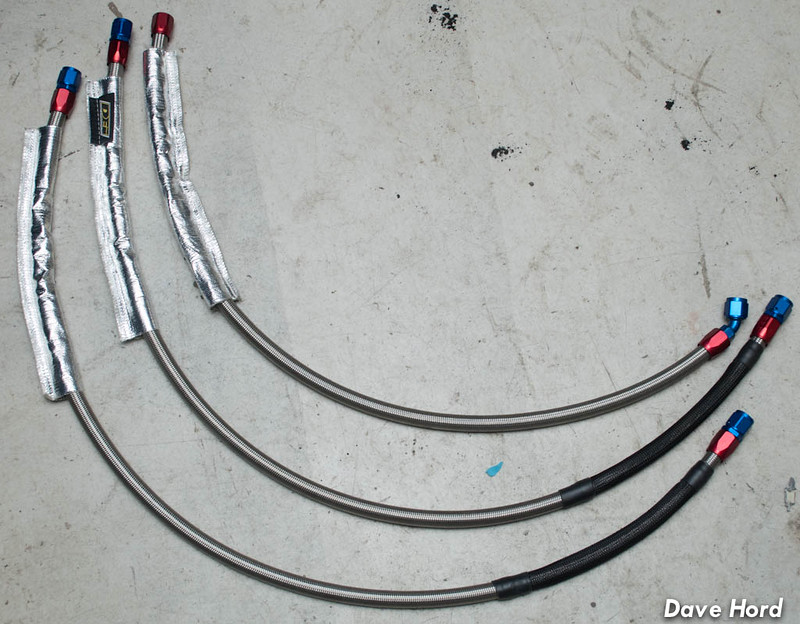 Once the motor was on the ground, I wasted no time in getting it into the car. I then wasted no time getting the motor OUT of the car, so that I could install the forward tin piece :P The motor then made its way back into the car. Fortunately I hadn't bolted it in the first time! The oil lines quickly followed the engine install. I ran the scavenge and pressure-out lines like I had them on my '69, below the exhaust pipe. The feed back into the engine goes between the two exhaust pipes. I did some head measurements on the '69 with the temp gun and this routing should be fine with the heat wrap in place. I'm thinking I may end up cutting the other two lines shorter to run them to though here as well, to keep them from hanging low. Will sleep on it (eventually!) to decide what to do. The photo does make it look far worse then it is, they hang about 1" lower then the heater box. 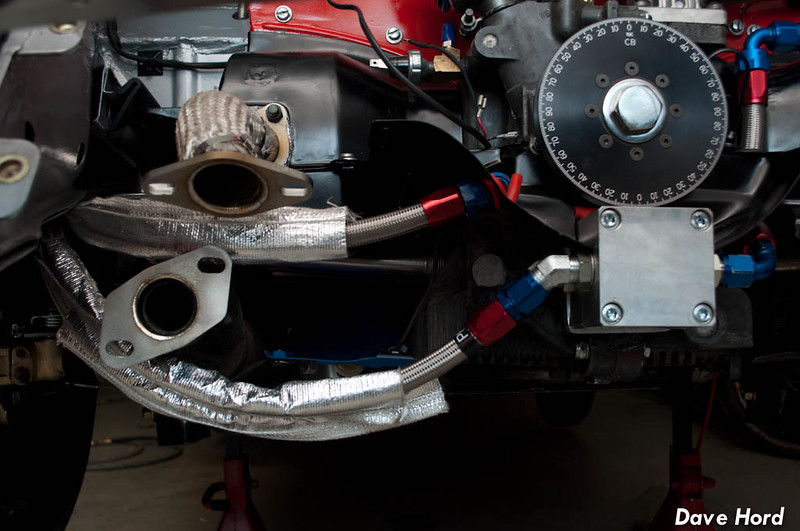 With the motor in I began making the rest of the crankcase breather lines. My spool of Russell -8AN line was getting to be very short, and I was starting to think I was going to run out of line. The crankcase lines are quite tight in a number of spots...and I won't lie, dropping the engine is going to be a bit annoying with all the oil and breather connections to deal with.  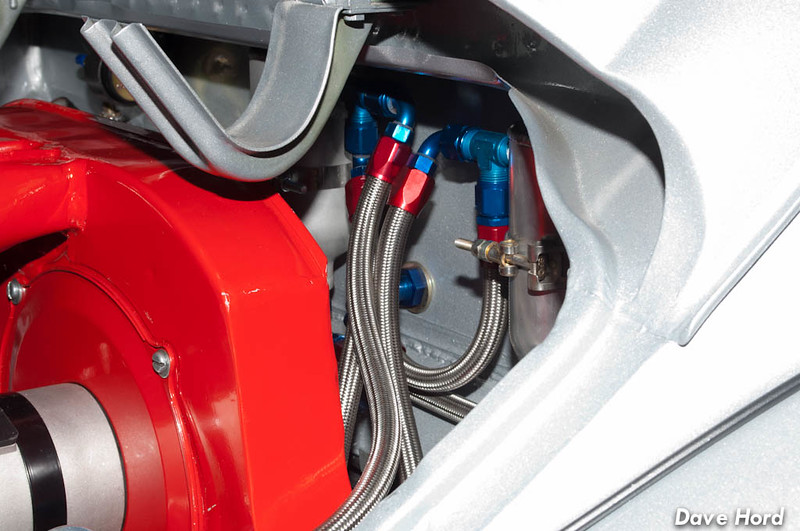 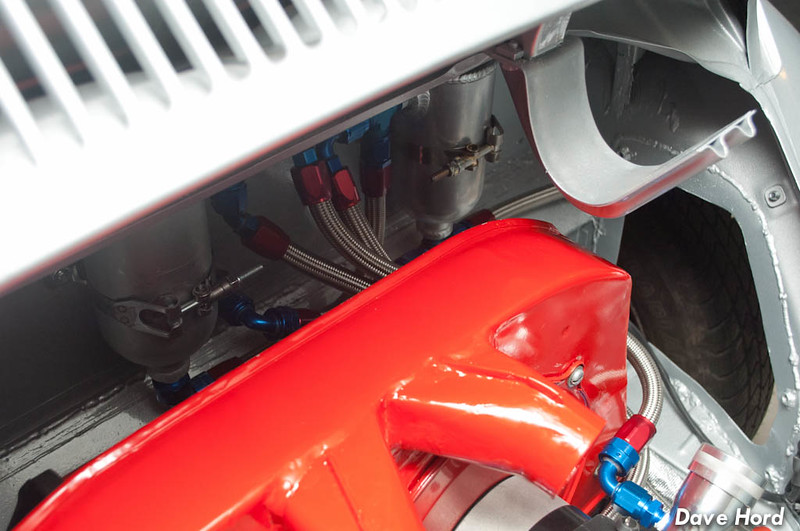 At this stage I was about to call my night a success, finishing all my goals, when I realized I had missed one line. There was still no oil-tank-to-firewall breather line....but there was no oil line material left in the box! All I had was about a 12" section on the floor, the final scrap. Unbelievably, it was 1/2" longer then I needed. One cut and a couple of fittings and the lines are done! Sixty-Five fittings, adapters or hose-ends make up the entire oil and breather system on the car. Popped the right-side carb on the engine to confirm all my lines clear, not quite sure how the ignition wires are going to work, but I'll solve that problem tomorrow.  -Dave
__________________
'71 Type 1 - Rally Project '58 Type 1 - I bought an early!?! '73 Type 1 - Proper Germanlook project '68 Type 1 - Interm German 'look' project '75 Type 1 - Family Heirloom '93 Chevy 3500 pickup - Cummins Swap
|
|
#294
March 28th 2012, 10:52
|
||||
|
||||
|
If I could make a suggestion, if you'll be pulling the motor several times you should install quick-release sleeves on your oil and fuel lines to keep everything clean when you have to pull the engine for maintenance, etc. Kind of like this, similar to an air fitting line on your compressor:

__________________
'66 Bus(11-window, CLK rims, disk brakes, IRS, bags, hydr. clutch, Super-1600 w/injection)
|
|
#295
March 29th 2012, 02:41
|
||||
|
||||
|
Today I zipped down to see Erik (vw1303) to borrow the heavier springs he offered for testing some spring rates. Since I was halfway there, I also zipped out to AVR for a coffee (thanks Vic!) and to pickup some more parts. Outside of a few odds-and-ends, and the final rear spring choice, I think I finally have everything I need to finish the car!
 I was absolutely bagged from the past week and hours of driving, but once I woke up from the couch I did my mandatory hour in the garage. Got the carbs on, the linkage in, electrical and fuel lines hooked up before I ran into a problem. CB Performance lists on their website "This pulley will clear all dry-sump oil pumps." What they forgot to mention, however, is that you may not be able to install the fan belt on all oil pumps. Sigh.  Okay, so not a huge deal in the shop. Pop the pulley off, slide the belt on and reinstall. As a roadside repair that means waiting for the pulley to cool, hoping you can wiggle it off and reinstalling...not ideal. Will have to check to see if different belt manufacturers use a thinner belt design. Will definitely be getting a serpentine belt system though! -Dave
__________________
'71 Type 1 - Rally Project '58 Type 1 - I bought an early!?! '73 Type 1 - Proper Germanlook project '68 Type 1 - Interm German 'look' project '75 Type 1 - Family Heirloom '93 Chevy 3500 pickup - Cummins Swap
|
|
#296
March 30th 2012, 04:48
|
||||
|
||||
|
Quote:
In other news, I started to tackle the last dry-sump issue (I hope). The BugPack pump is long enough that standard exhaust systems won't fit, but a few cuts later...and it fits like a charm.  Hopefully I can get one of the guys at the Rallyshop to TIG weld it back up for me this weekend. Still deciding on whether I'm going to wrap the muffler or not, it's still pretty close to the oil pump heat-wise. 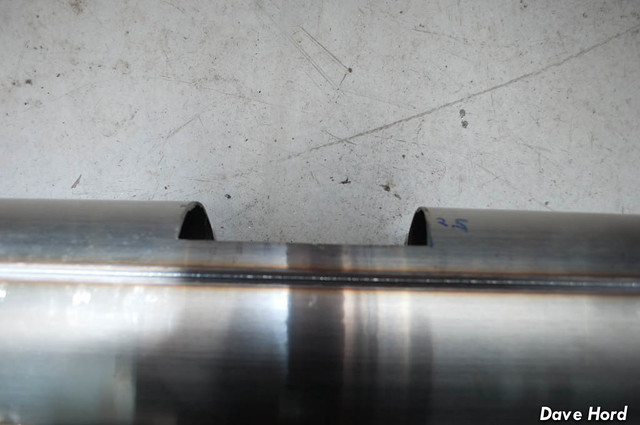 On the fan belt side of things, I opted to just pop the pulley off this time and mount the belt. I've only every had one fail, on a car I bought with a ratty belt, but that doesn't mean I shouldn't plan for the possibility while I wait for a serpentine setup. Not sure what the plan is at the moment, but I'm sure I'll come up with something. Can't turn the pulley down (belt rides right on it's outside edge) and can't machine the oil pump. The solution might be as simple as trimming a few teeth off a belt and taking it easy until the hotel. Not elegant, but it's such a remote possibility I'm not sure another solution is required. Moving to the interior for a change of pace, I popped on the rear interior panels and started on the cover for my access hole. Really not happy with it at the moment, I wanted to avoid a million bolts holding it down, but the seal I've used is so thick it distorts with the few bolts I've used. Might go back to the drawing board on this one. 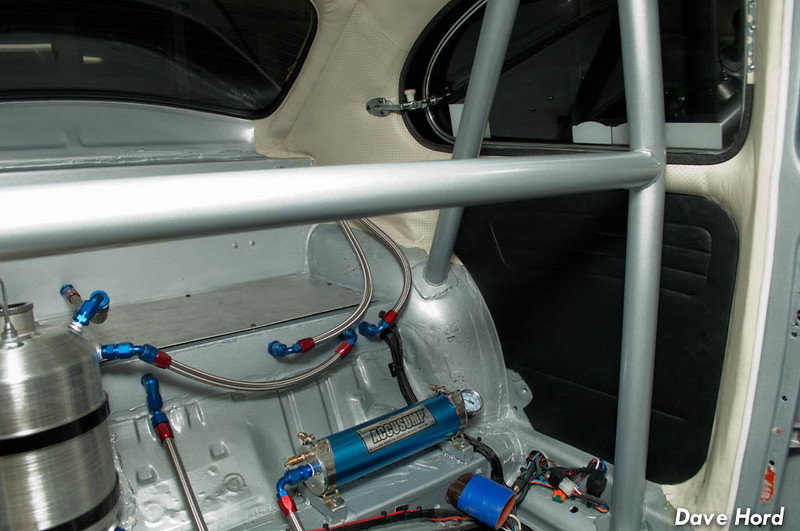 And then it was back to the engine...I finally got around to buying high-flow heater boxes, though I will admit to buying the cheaper version. At this point saving dollars wherever possible is a good thing, and Rob and I figured I've fabricated enough at this point that I could fix any issues I encounter. First up was removing the flanges off the one end. 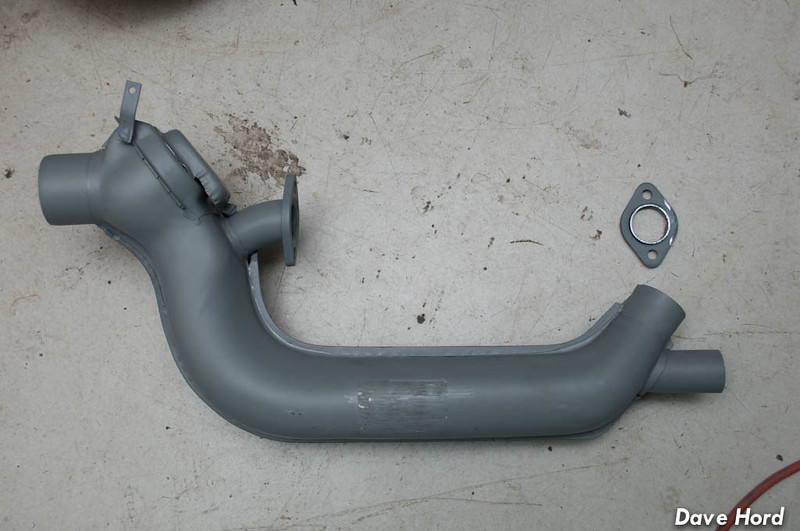 ...I think I found the dollar savings :P A few tweaks and I was able to get the brackets working. One on, one to go! 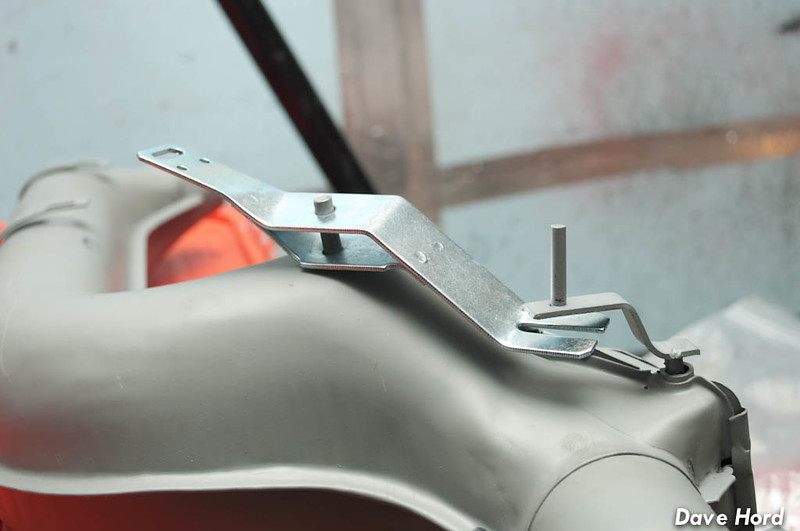 -Dave
__________________
'71 Type 1 - Rally Project '58 Type 1 - I bought an early!?! '73 Type 1 - Proper Germanlook project '68 Type 1 - Interm German 'look' project '75 Type 1 - Family Heirloom '93 Chevy 3500 pickup - Cummins Swap Last edited by owdlvr; March 30th 2012 at 12:40.
|
|
#297
March 31st 2012, 02:54
|
||||
|
||||
|
Started off by making the pieces to patch up the clearance hole I made in the exhaust. A friend at Rocket Rally is going to TIG weld the pieces in for me, and if I'm lucky he won't need to use any filler rod. Here's hoping my parts are a tight enough fit!
 No problems at all with the second heater box...though I did manage to bolt it all up to the car before I realized that I forgot to cut the flange off the rear-end. Oops! Fortunately a sawzall made quick work of the flange and I'm ready for the muffler when it comes back from welding.  While I was under the car, I took the time to swap in the springs that Eric loaned me. They're a 550lb spring, but about 1.5" shorter then the 300lb springs I removed. Lowered to the ground, after a rough pre-load adjustment, the 550's sit about the right height for a "stock setup". The length of Eric's springs do let me max out the suspension height, but I'd be at the absolute limit of of the coil over threads. They have, however, served the exact purpose I needed, which was to figure out a starting point. I'll need to buy a longer length in 550, and I intend to do some crunch math tomorrow to determine the wheel rate on the car and why I was so far off with the 300's. 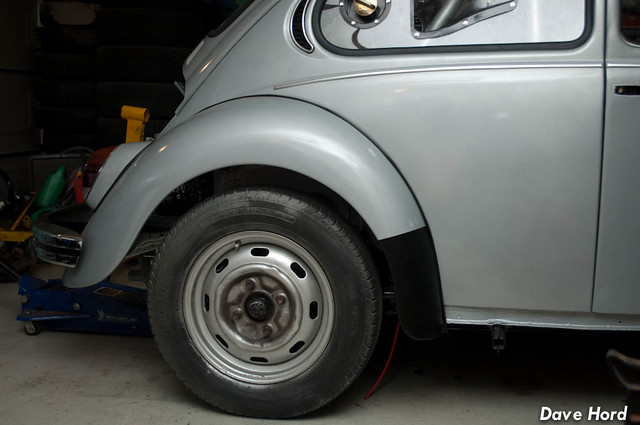 With the rear sorted, I figured I should adjust the front a little. 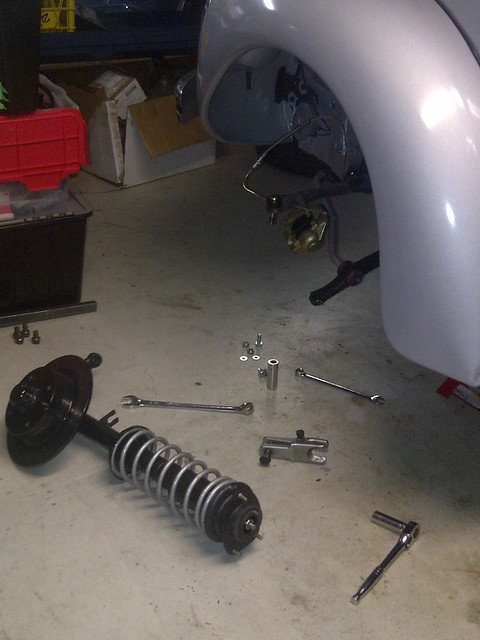 Nothing really special here, just a 1" 'lowering spring' which should probably get me to the ride height I wanted to start with. Again, the whole purpose of running standard-type springs up front is to give myself some resemblance of a starting point that I could work from for matching up the rear.  So here is the car sitting on the ground "dry". There's no fuel, oil, belts, seats, apron or decklid. But it does have all the glass, engine, etc. Sitting dry it's a great "rally height", which means wet I should end up a little closer to a street height. That also tells me that wet, I have some latitude for getting it up higher. I mean, it's all speculation at this point but it feels way better seeing it sit in a way I was expecting instead of scratching my head figuring out what the heck I messed up. 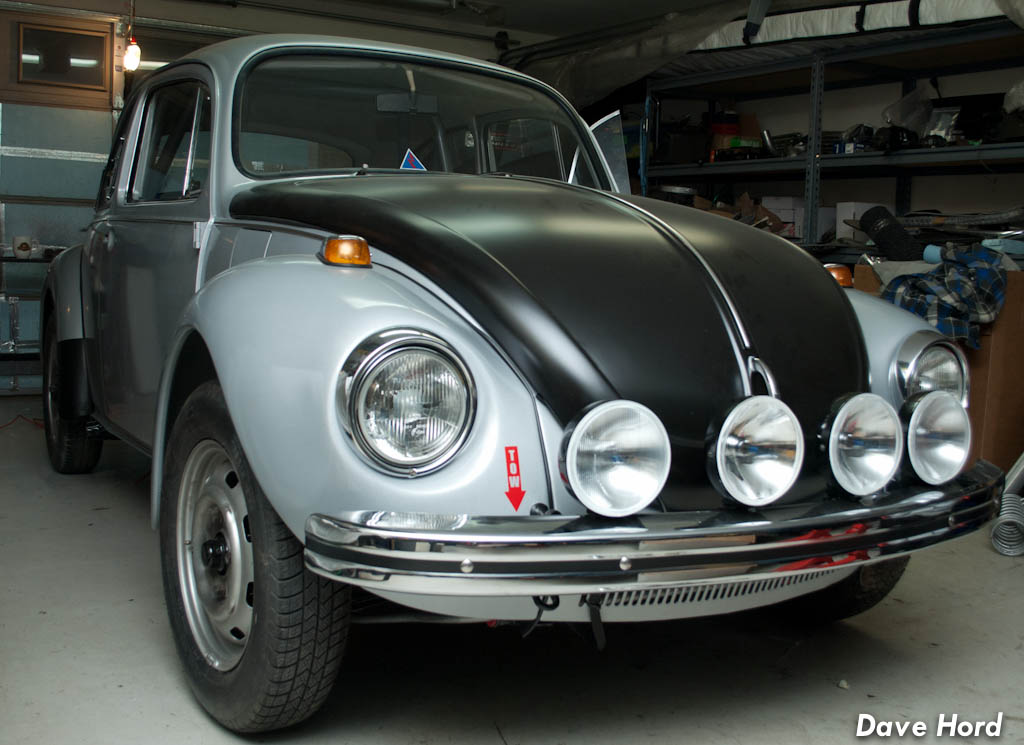 I figured I would end on a good note, and called it a night. LOTS of little jobs to accomplish this weekend, as well as that big job of lower shock mounts to be done at some point. I'm using outside help on that one, so I'll just work on knocking down the to-do list over the next two days. -Dave
__________________
'71 Type 1 - Rally Project '58 Type 1 - I bought an early!?! '73 Type 1 - Proper Germanlook project '68 Type 1 - Interm German 'look' project '75 Type 1 - Family Heirloom '93 Chevy 3500 pickup - Cummins Swap
|
|
#298
April 1st 2012, 04:40
|
||||
|
||||
|
Today started off as a bit of an odds-and-ends days. I was working on the heater box cable linkage when I got the call that Nick was over at the rally shop. I loaded up the wheels and tires that have been in on the car, and took care of flipping the tires around (so the overspray from previous paint job doesn't show) as well as solve the slow leak in two of them. Rusty rims were attacked by the wire wheel and all seems to be holding air now. Not that I plan to use these wheels and tires, but so far Lorne hasn't had time to dig up the rims I'm getting from him and tire-company-which-will-remain-unnamed hasn't jumped on board with some fresh shoes for the car. So, for the moment, it will have to hang out on these.
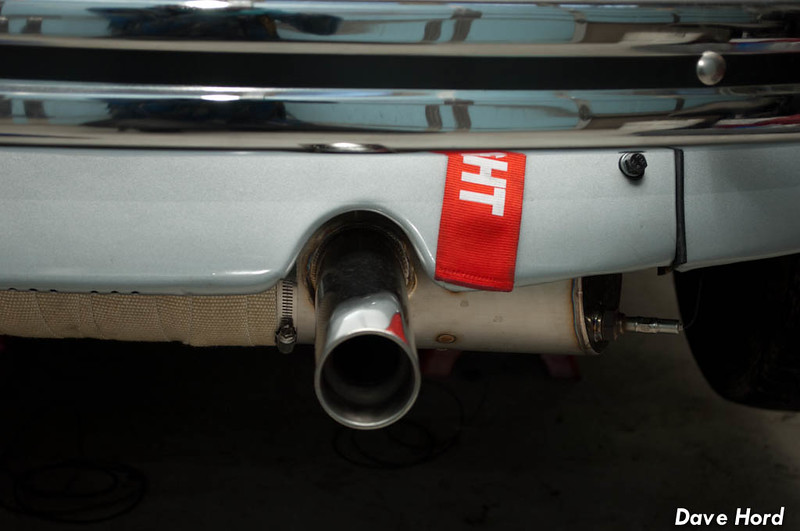
I also mounted up one of the spare 15" snow tires I have kicking around. By law where I live you have to be running snows (or carry chains) until April 30th, so when I get the car on the road I'm going to need something for while I'm out doing shakedown runs. A 195/55/15 looks hilarious on a 4" rim...but not exactly safe. Will have to see what else I have hiding in the tire and wheel collection. Might be time to break out the original German Sprintstars! While I was playing with tires, Nick was welding my exhaust (and swearing my name). I guess the only stainless I could get in town was causing him fits as it was a bit thin. Good thing he's had my sandblasting cabinet for six months...otherwise I might owe him an even bigger favour :P With the exhaust welded up, tires ready, and the heater box cables hooked up I then moved on to sorting out the other "under car" items I need to deal with. The starter was wired up, one transmission leak was "solved" and another mysterious leak found...but still mysterious. I'm getting a clear-yellow fluid with no smell weeping down the side of the transmission it takes over a week to form any thing even close to a drop-sized amount on the bottom of the transmission. It would seem to be coming from the reverse switch seal, as that portion is wet but not immediately above it. The weird part, though, is the transmission fluid is red...and this doesn't smell at all like trans fluid. My initial thought was brake fluid, but all the fittings and lines on the rear are dry. Very odd. Leaving that alone, it was time to hook up the heat between the engine and the body. The '71 came to me with these terrible black plastic units which obviously won't fit with all the stuff I've crammed in under the car, so I began stripping it down to it's core to determine what I might be able to build to suit the purpose. 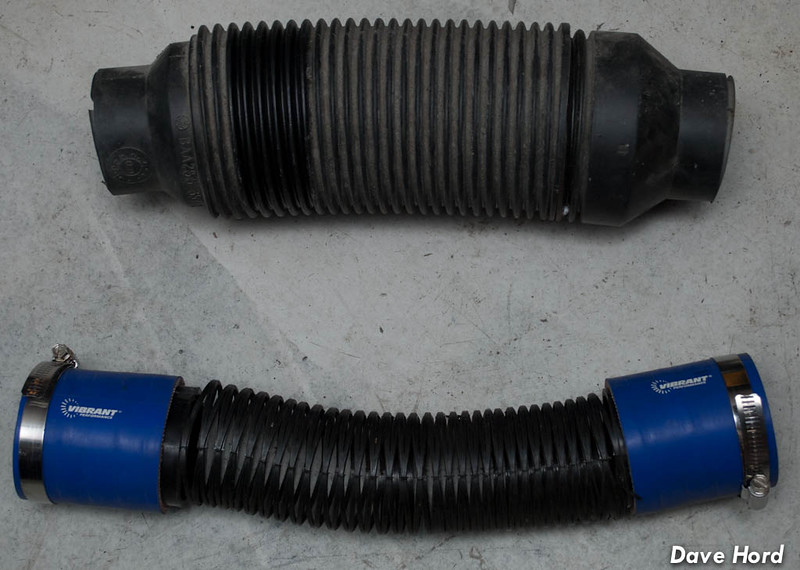 I was thinking of taking the plastic core, and simply wrapping it in heat wrap, when I found stainless steel corrugated pipe in one of my many parts bins. Dad had given these to me years ago when I bought the '69 (and promptly stole as many parts from him as possible). I remember him mentioning that he used to use similar stuff in the engine bay for heater tubes. (Must have been those whacky 80's). For what I needed though, they'd be perfect. 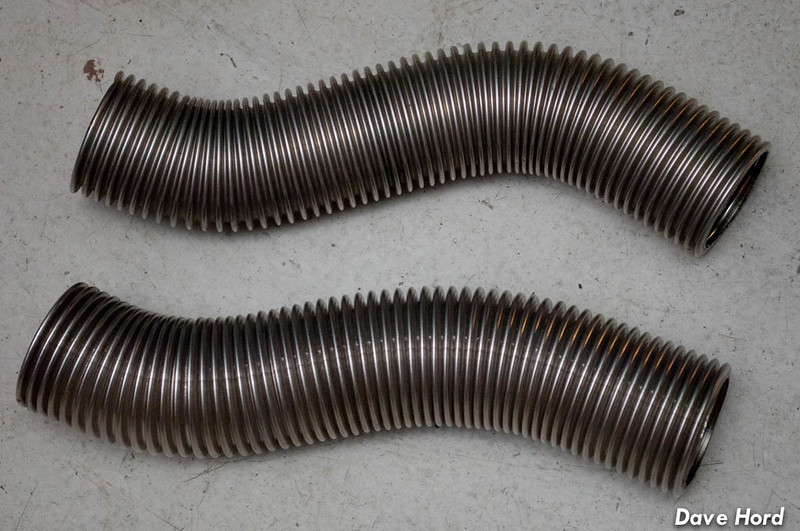 I didn't want to leave them just as the bare metal, as I do know that the airflow right out of the heater boxes can be incredibly hot. No need to risk melting any wiring when I have a spare roll of exhaust wrap kicking around. Finished heater duct, ready for install:  While I had the exhaust wrap out, I took the time to wrap the portion of the muffler that close to the oil-pump. I definitely didn't want to wrap the muffler, as this stuff retains moisture and frays, and looks like crap after a while...but at the same time I'm so close to the oil pump I think anything I can do to help with heat is a good idea. I'll get rid of the hose clamps once I figure out where I put my stainless safety wire. 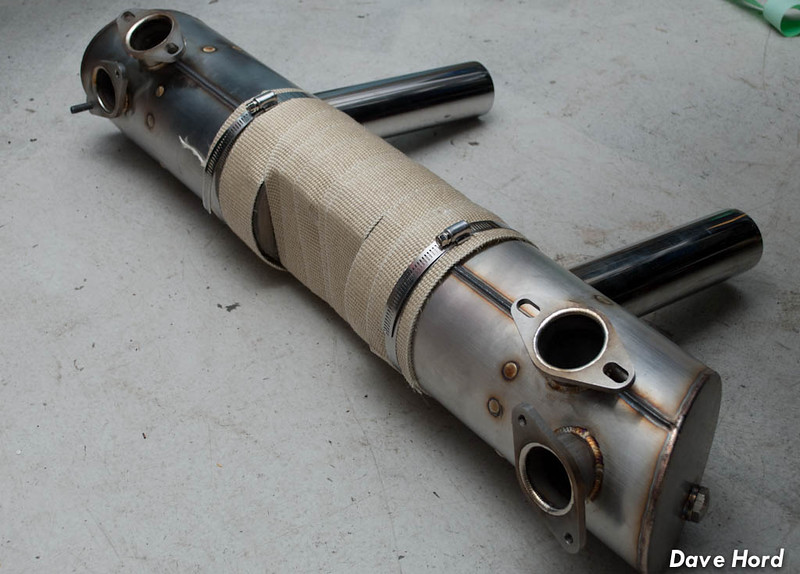 I figured that mounting up the exhaust was going to be a breeze, but then discovered a problem I hadn't thought of. When I ordered the exhaust with Vintage Speed I was running standard heater boxes, but after seeing the quality knew I just had to uprate them to high-flow boxes. The problem was that Vintage Speed had sent me the flanges I originally requested, which were for stock sized pipes. A few cuts with the angle grinder, about 6 on-and-off fittings of the muffler, a little welding...a bunch of grinding...and I had flanges mounted to my heater boxes. 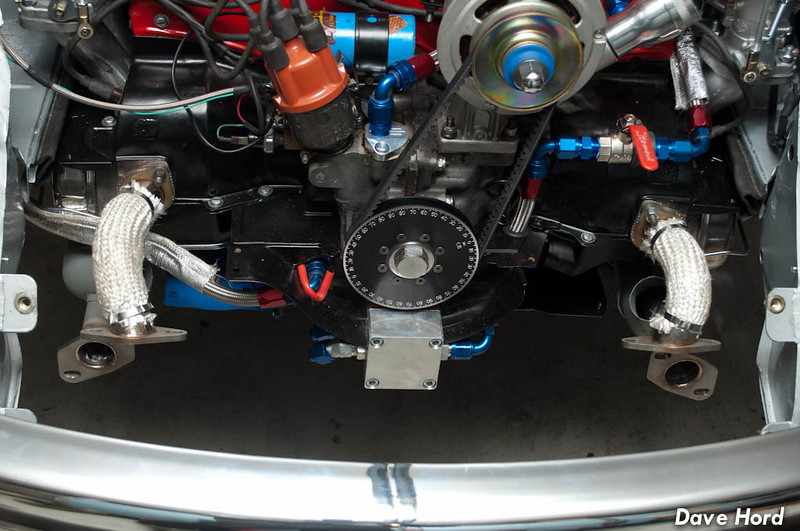 Muffler and rear tin installed:  ...and with the rear apron and heater hoses:  I have to say, I am soooo stoked on the body modifications I did. Between the firewall move, the Weber doors, access panel and the removable apron I can't pick my favourite...they are all so awesome. I can't believe I worked on the '69 for so long without any of these mods. I don't think I could own a modified Beetle without them now. That month of cutting, welding and grinding was 100% worth it! Case in point, I pulled the plugs to prep the car for building oil pressure. Took me 30 seconds, and one long spark plug extension. True, I have the wheels off so it's easier, but that would have been a bear of a job without the weber doors. Where were we? Oh right, oil pressure. Well, for whatever reason I decided to prime the fuel pumps first. 10L of fuel went into the car (no leaks!), but my fuel pump wiring isn't working as planned. Pump one is working fine, but doesn't shut down without a tach signal as it should. Pump two has an issue at the switch, which is new as I know I had the pump working when I was testing the dash. Regardless, #1 was pumping away and I was working on solving number two when I realized it was getting really smelly in the garage. "Hmmm, has the fuel gotten to the back already?" I could hear air bubbles working their way out of the system as I walked back, only to realize that no...those are airbubbles being worked out of the #4 intake runner as the left-side carb pukes fuel everywhere. Yeah, float level? Not so correct. With that fixed, I have a surprisingly well-sealed fuel system! The fuel tank breather still needs finishing (just an 8" hose at the moment) but otherwise it's leak free. I filled up the oil tank, oil filter and tossed a litre in the case-sump to help prime the scavenge stage of the system. I started priming the oil system and realized a few things. First off, this was going to take a while due to all the lines...and secondly, if you're contemplating a 901 swap...do the starter modification now before you install it. My starter doesn't engage the teeth properly every time, so until I mill .100" off the front face of the starter I'm going to sound like a jalopy every few startups! Priming the oil system sucks. On a stock 1600 build you might have to hold the key for a total of 30 seconds to prime the pump and the engine...but I have like 30ft of oil lines and accessories. This isn't going to go quickly! The whole time that poor motor and its bearings are riding on assembly lube and/or oil-film. I usually begin by undoing the outlet on the oil pump so that I can go in 10sec bursts until oil is being pushed out the pump. Then I attach the pressure line, and disconnect it at the next fitting. Again running the engine in short bursts until I can see oil. I do this at every fitting, every stage, for the whole oil system. Things like the accusump and oil cooler are disconnected (and their fittings capped) until I can reliably build oil pressure. It takes forever, but at least I can check each fitting for leaks as I go. About an hour ago I finally built up pressure in the engine with everything but the Accusump lines attached. With it being so late, I figured that my neighbours would probably appreciate me packing up for the night and installing the plugs tomorrow. I have to run down to Vancouver at some point, but hopefully I will still have time to shoot a video of it firing up. Not bad for seven months work! -Dave
__________________
'71 Type 1 - Rally Project '58 Type 1 - I bought an early!?! '73 Type 1 - Proper Germanlook project '68 Type 1 - Interm German 'look' project '75 Type 1 - Family Heirloom '93 Chevy 3500 pickup - Cummins Swap
|
|
#299
April 4th 2012, 14:24
|
||||
|
||||
|
This forum needs more build threads! ;-)
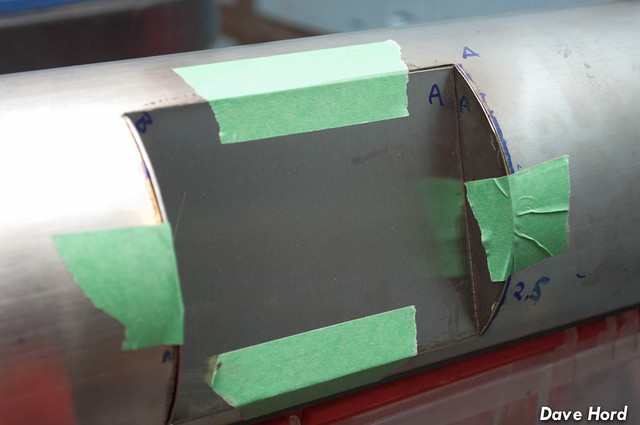
Alright, where was I? Oh right, Saturday night I went to bed with the oil system primed. I slept in a bit on Sunday, then headed down to the shop to fire things up. I had to button up the top half of the motor, and deal with a few little issues, but soon the time came to turn the key for the first time. I held by breath, pumped the accelerator twice and promptly ground the starter gear into the flywheel. Crap. I am fully aware of the issue that the starter only engages about 1/3 of the flywheel teeth width, but other porsche-box swappers seemed to have neglected to report the fact that this means you'll likely be grinding the starter on a number of attempts to start. Okay, mental note...pull starter so that material can be milled off the face. I turned the key a few more times before it finally launched itself into mesh, and the motor fired right up! There is that moment of elation, where you realize it's finally happening, you're close to driving, you blip the throttle twice (always twice...why is that?), walk to the back of the car and see a nice puddle of synthetic forming on the floor… 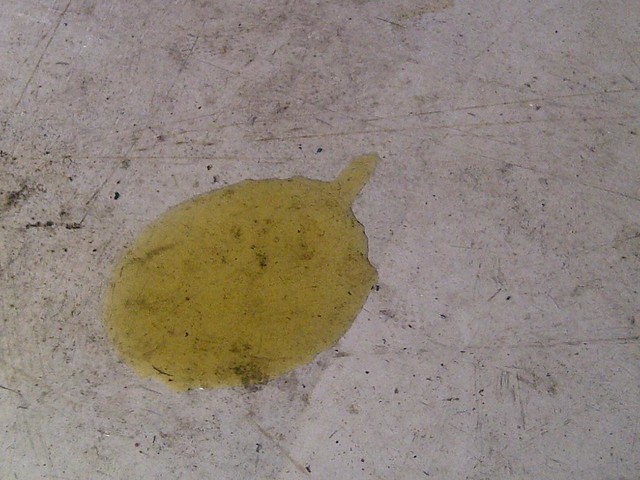 Turns out I forgot to tighten one of the oil lines which is close to the exhaust, almost impossible to get a wrench into...but after a few choice words I managed to get it tightened up. 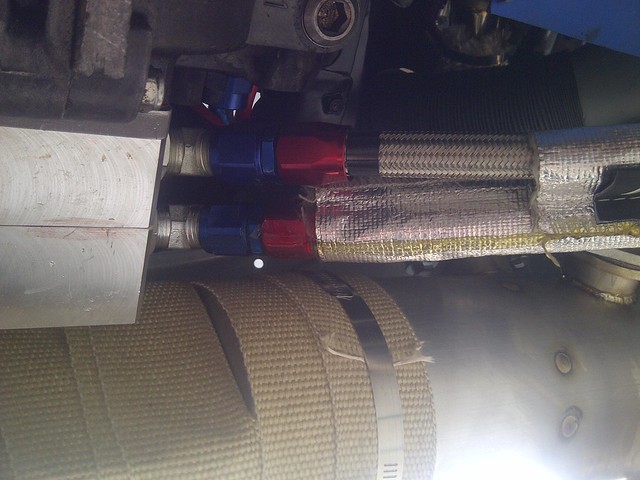 I fired the car back up again, with the intention of letting it warm up enough to start bringing the oil up to temperature, and shoot a video of the car actually running. I couldn't quite place it, but the engine "sounds funny". It's got a strange hollow sound to it, and there was definitely more noise to the engine then I think there should be. Problem is the bottom end hasn't been touched, so it should be fine...unless I managed to flatten the cam while priming the oil system? Either way, I had to leave the car as is and run some company errands for Classic Car Adventures. On the way to Vancouver I called Mark Huebbe in Missouri and talked with him about his dry-sump engine, which is the closest in setup to mine as I can find. No strange noises from his, and certainly no 'hollow" sound. He's run his dry of oil a few times, and the bearings (checked months later) always look perfectly fine...so he did calm me down a little! When I returned to the car, I figured I would ignore the engine momentarily and instead work towards getting the rest of it ready. I was planning on an alignment Tuesday, so started working on the rear suspension. Through a series of strings, measurements, 3D modelling and lots of scribbles on cardboard I thought I was getting a good grasp of the rear suspension alignment. Math was never my strong point in school, so sorting this out was one of the more challenging aspects of my build! By Sunday bed time I figured I had the rear end either somewhat close...or so far off it was to be laughable. 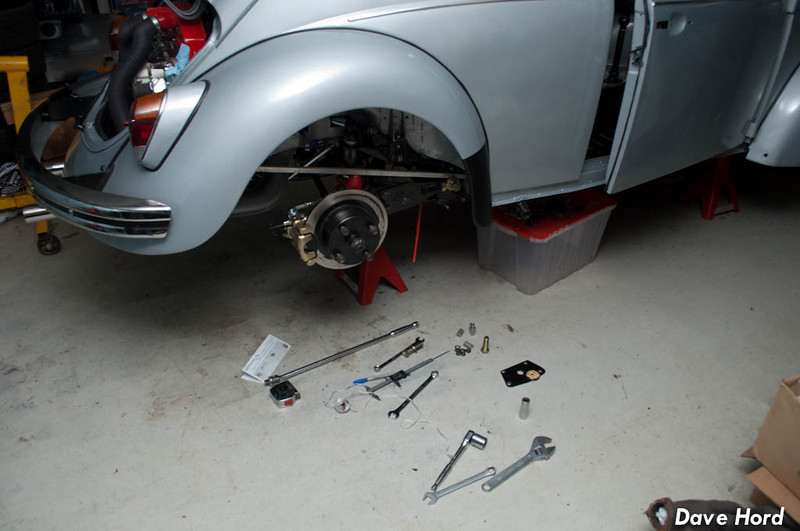 Monday started with a 4am run across the border to grab some parts I had shipped to Blake, back in time for work. Warwick had also returned home on Monday, so while he was gearing up for working on the Mini I figured it was a good time to get a second ear listening to the engine. From the very beginning I figured it was my mind playing tricks on me, and that fear of destroying something while priming it. I honestly think I get this every time I setup a new build! I fired it up, grinding the starter a few times in the process, and Warwick confirmed that it "doesn't sound bad at all. A little 'clackety', but not 'gonna blow up tomorrow' bad". Hmmm, clackety is probably the valve adjustment. Duck an ear into the fender and sure enough 1/2 is sounding quite loud. I did a quick valve adjustment, even though things were a little warm at this point, and as soon as I did all sounded normal. Ah yes, 24 hours of torture because I can't remember what a Volkswagen should sound like! The odd part is that I was sure I checked the valves on #1 while it was on the stand. If I _did_, then I most likely have an issue where the cam is going flat or similar. But I do know for a fact that I did not do a valve adjustment on all four, and even said to myself "I might as well do that when it's in the car"...so there is a very good chance they were just "in need" and there were no problems. Will have to adjust them cold, and then keep track if they are changing at all. With that, I moved onto swapping out the springs. I picked up a set of Eibach 550’s in an 8” length, an they’re a perfect fit.  Yesterday was Alignment Day…or so I hoped. I did drive the car out of the garage and onto the trailer, which I have to be honest brought a huge smile to my face. It came off the trailer and onto the rack with no drama. OK Tire in Squamish was pretty incredible about the whole thing. I explained the issues with the rear end, and he agreed to three setup and alignments charged at the end based on the time it took the boys. We would need to measure, then take the car home to change the rear end, measure again (thus giving me a baseline of “two turns equals X degrees) and then go home for a final measurement change. Off to the gas station for the first time!  Once I got the car on the rack it was apparent that the first thing I would need to do is fix the fuel leak Fortunately it was a quick hose clamp, for the gas heater and NOT the one found buried under the tank!Grant at OK Tire called me about 30min after I dropped it off to say “come and get it”. The rear end was so far out it would have to come home. -2.2deg of camber on the left side, -0.8 on the right. 0.18deg positive toe on the left, 0.30deg of negative toe on the right. Well shoot, I didn’t even realize camber was that adjustable on the rear, how would I fix that!?! 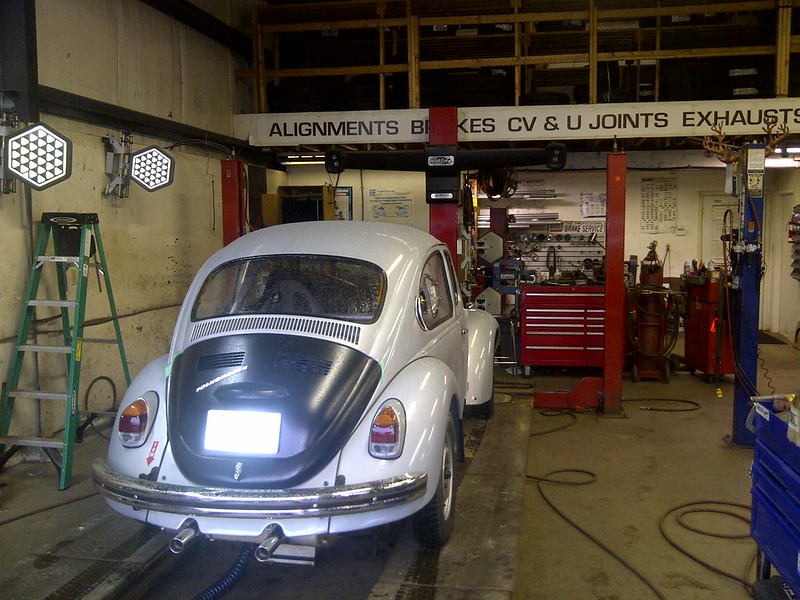 Thankfully Bruce Tweddle’s post on TheSamba was readily available on my iPad, and the camber adjustment was easy enough. I dialed in back end of the car over lunch, and brought it back at the end of the day. We tossed it up on the rack and found that I had fixed the left side, but gone way too far on the right. That’s when Grant came through with the best news ever. “I don’t have another car booked on the rack, if it won’t take too long just fix it here.” We jacked up the rear, pulled the tires and in less then ten minutes we had adjusted and checked the suspension twice. I’ve got .06deg negative toe on both sides, and -1deg of camber on both sides. I left the guys to dial in the front, but thankfully caught them before they had finished the camber adjustment. The factory spec calls for .2 to .8 positive camber! Uh yeah, sorry guys but I’m not doing that! We dialed in a half degree negative and I’ll see how that works out. …and that’s where it sits right now. I can’t drive it because I still need to tune the carbs, and fix the lower shock mounts on the rear. The 50ft between the trailer and my driveway were quite exciting though. My shifter setup works perfect for going from dogleg 1st to 2nd without catching reverse, but that’s about all I can report. - The starter grinds - The clutch feels HORRIBLE (needs additional return springs for sure) - The throwout bearing is noisy (oh weee, another engine pull) - …and I think I found a few other issues. But hey… IT DRIVES!!! Also had to dial in a few things for weatherproofing the car (it was raining yesterday). So Monday night saw the addition of the engine deck lid, some ducting for the oil cooler, door handles and a few other odds-and-ends. I kinda wish I could run without a license plate! Mounting the decklid did reveal an item I forgot to pre-plan for. The license plate light has no wiring, and no where to connect it! Whoops. 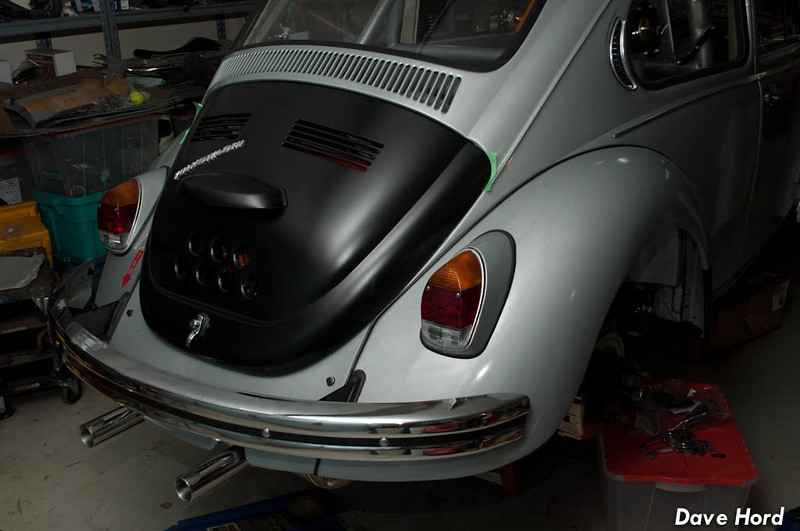 With the plate installed. The plate sits on ¾” spacers to allow for airflow. You can see the green tape in the corners, I can’t find a way to adjust the decklid so it doesn’t hit here. Might just use 3M stoneguard to protect the paint. 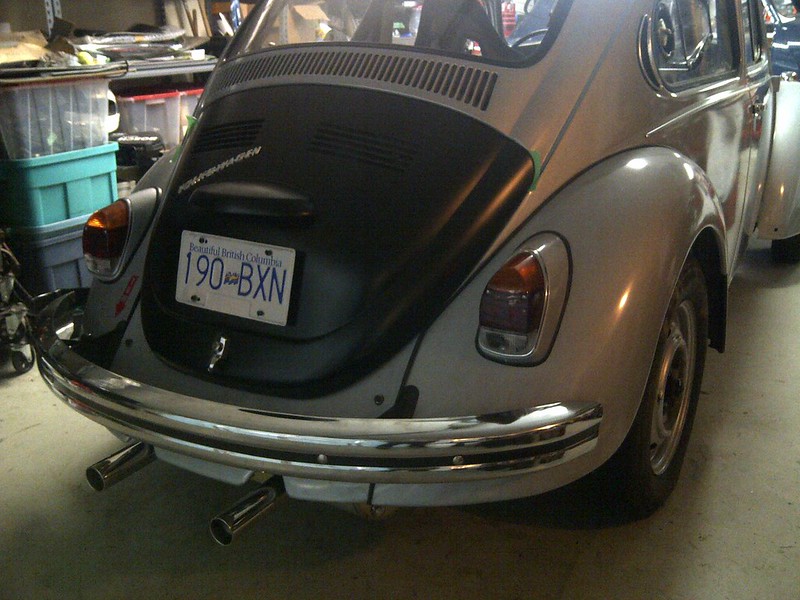 The oil lines are actually tucked up quite high, this is temporary with zipties but now I know where to put the proper clamps. 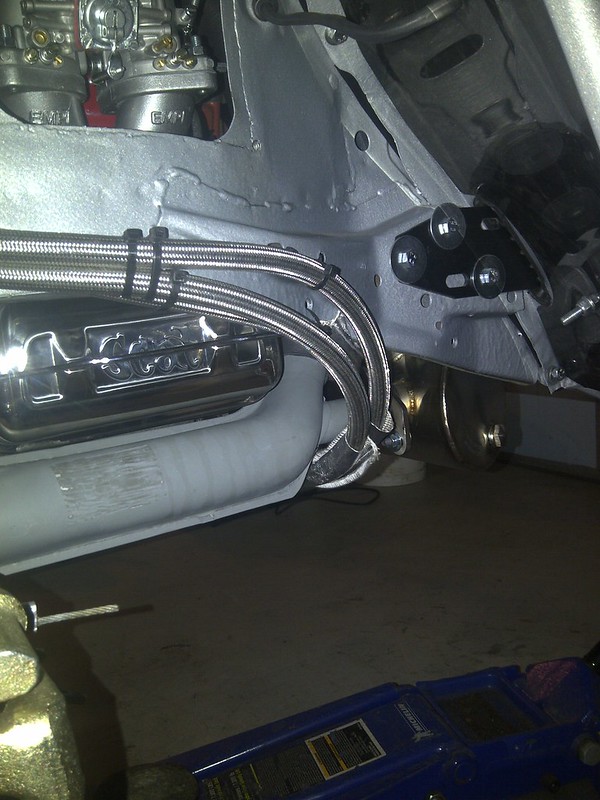 Oil cooler ducting. I have a tube of really nice proper racing duct, but unfortunately it’s just long enough for one side. It’s the high-temp silicone hose type for brake ducting, so I think I’m going to reserve it for front brake ducts should I ever decide to add them.  But really, you all came here for videos. So here’s a couple of startup/idle vids. #1 is Monday night, you can hear the valves clattering. http://www.youtube.com/watch?v=bH-Q6ZtgXbw [youtube]http://www.youtube.com/watch?v=bH-Q6ZtgXbw[/youtube] #2 is today, quick start up…needs some tuning. http://www.youtube.com/watch?v=iLRz--T2FZo [youtube]http://www.youtube.com/watch?v=iLRz--T2FZo[/youtube] Eventually I have to return Geoff’s trailer to Vancouver…so I’m going to see if I can rope either he or Darren into some carb tuning ☺. -Dave
__________________
'71 Type 1 - Rally Project '58 Type 1 - I bought an early!?! '73 Type 1 - Proper Germanlook project '68 Type 1 - Interm German 'look' project '75 Type 1 - Family Heirloom '93 Chevy 3500 pickup - Cummins Swap Last edited by owdlvr; April 4th 2012 at 15:10.
|
|
#300
April 5th 2012, 03:45
|
||||
|
||||
|
So tonight started out really well. I began by finishing the assembly on the rear suspension (putting my double-shear plates back on) and then while I was in the wheel-wells installed the rear mudflaps and O2 sensors. The bungs are placed for great readings, but are a little bit exposed. I suspect I might go through a couple of sensors! haha.
 I was going to hook up the accusump to the oil system, but before doing so though I'd check the oil level in the tank. My night pretty much went to crap right at the point where I turned the flashlight on. The oil was right up there, but I couldn't see the screen that helps remove air bubbles. Um, what? It took a second to register, but the oil was full of microscopic glitter particles. 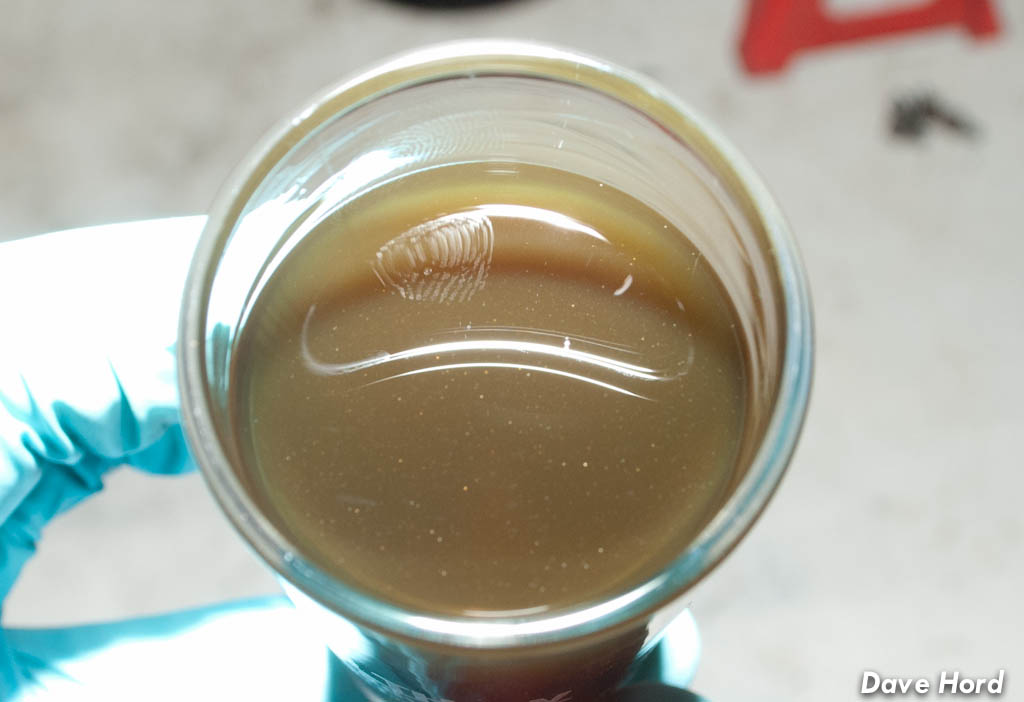 Even now, three hours after discovery I don't know how to put the feeling into words. I ran a clean magnet thorugh the oil and picked up nothing, which means it's more then likely aluminum from somewhere. I pulled the drain plug, which is magnetic, and it had virtually nothing stuck to it...just a bit of black particles that are so small they're virtually grease. I've seen more in regular oil changes then this. 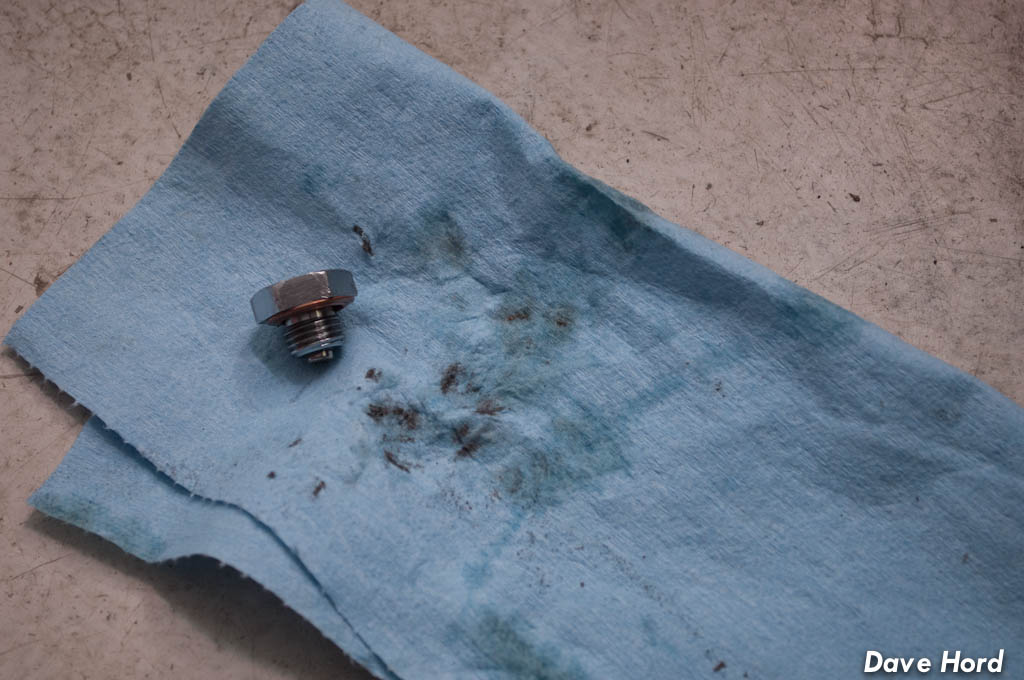 One option was to flush the motor and oil system twice with some cheap 5wt30, and then refill with my usual oil. Run it until it was good and hot, and then see if there are any particles. That's a big risk. I have to believe that whatever is causing this problem is only going to be more expensive the longer I leave it. I made the call to pull the motor, knowing that tearing it down means I'm very likely to miss the Spring Thaw event we run. By midnight I had the motor ready to come out, just the four mounting bolts are holding it in now. Since the oil was cold, though, it's taking a long time to drain out. I'll leave it until after work tomorrow as that should make the whole job a lot cleaner and more enjoyable.  I did learn a couple of things that give me some hope that it may not be too catastrophic. The oil in the 3/4 head is clean and I can't see a single particle with a naked eye and bright light. The oil draining out of any of the post-filter lines that I've pulled is perfectly clean without a single particle that can be seen with a naked eye and bright light. So far I have only found nasty oil in the dry sump tank, and the engine sump. This could mean that the vital engine bits were actually receiving clean filtered oil...at the very least, I know that the oil line going into the engine had clean oil in it. So from a "find the problem" perspective i simply need to follow the oil passages from start to finish until I find a bad part. Then, figure out what else it damaged down the line. 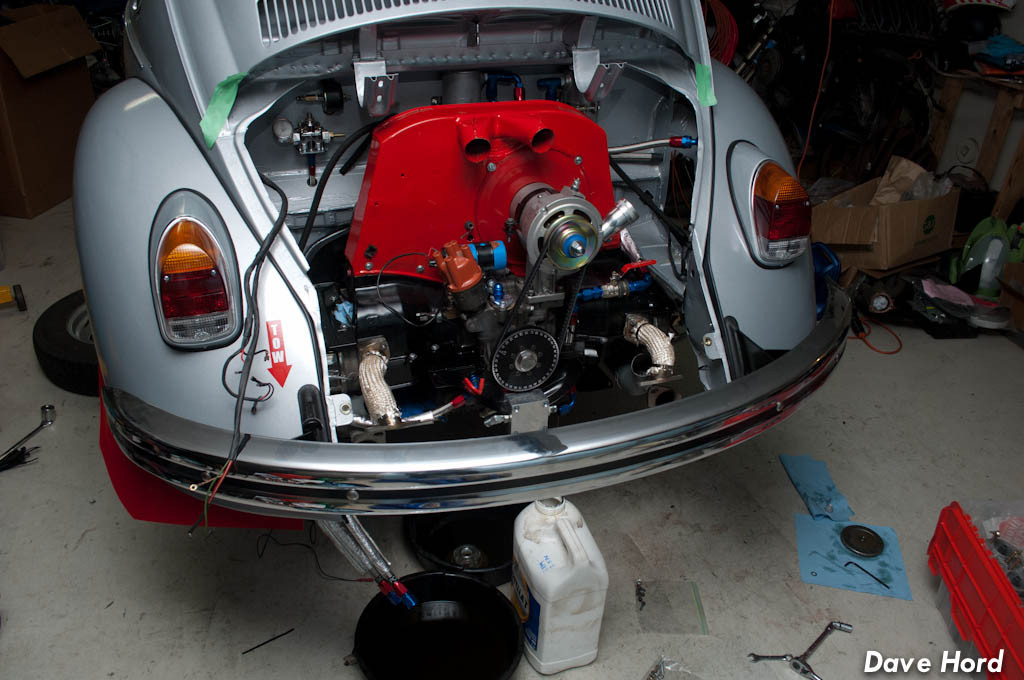 The Spring Thaw, my car's debut event, is April 27th-29th. I'm so hooped. I've blown engines before (even did one on the Thaw!) but I co-organize the event, I can't not make it! It's not the damaged engine, it's not the time, it's not the teardown and rebuild. If there is anything this thread could prove it's that I'm not scared to do the work! It's a bit of stress over the time crunch, but really it's the knowledge that I've really stretched the financial lines getting the last assembly stuff finished. There is just no more room to squeeze. Getting the engine ready to pull was good, gave me a way to spend time and not think about anything but dis-assembly steps, bagging and tagging. I have this funny feeling tomorrow at work is going to be a really tough day to get through. -Dave
__________________
'71 Type 1 - Rally Project '58 Type 1 - I bought an early!?! '73 Type 1 - Proper Germanlook project '68 Type 1 - Interm German 'look' project '75 Type 1 - Family Heirloom '93 Chevy 3500 pickup - Cummins Swap Last edited by owdlvr; July 15th 2014 at 16:29.
|
 |
| Currently Active Users Viewing This Thread: 1 (0 members and 1 guests) | |
|
|


 Linear Mode

