
|
|
#181
 April 20th 2010, 01:31
|
||||
|
||||
|
Lookin good! Should be a serious tire shredder.
Jason
__________________
If I could just get paid for my sleepless nights.... 1960 VW Bug UBRDUB Walkaround 1st Drag Run Dyno Run Oval Ragster-'57 Rag/'04 Boxster S 
|
|
#182
April 20th 2010, 11:16
|
||||
|
||||
|
Quote:
|
|
#183
April 22nd 2010, 17:48
|
||||
|
||||
|
Been painting with MasterSeries rust sealer and sealing seams this week. I've finished the sealing the floor, the firewall, the rear wheel wells, and the radiator metal work in the back (which I forgot to take pictures of). I've applied a coat underneth the backside of the car and working my way to the front.
Used 3M sealer. Stuff reminds me of heavy duty Elmer's glue. Haha...   My wheels came in. I order Jeg's Weld knock-offs instead of Summit's cause Summit didn't offer the offset I needed. I'm sure they the EXACT same thing, just different center caps. I forget how small 15" wheels are after having the 16, 17, and 18 wheels floating around this whole time. The size I got are... 15"x4" front w/ 1.75" back space 15"x10" back w/ 5.5" back space Tires will be... 165/80/15 front 275/60/15 back I'm going to Discount tonight to new get tires. Tires are going to be $300. Can you believe that? $50 each for the front's and $100 each for the backs. The wheels are pretty nice knock offs for the price. They'll make for great street wheels. Gotta bee even more budget minded that the kiddo is on it's way and the wife will be a stay at home Mom.   
|
|
#184
April 22nd 2010, 18:04
|
||||
|
||||
|
I think you've definately strayed from the GL concept! I just can't put Weld wheels and GL in the same sentence(oh, I just did) but it's still going to be a lot of fun to see that thing finished.
Jason
__________________
If I could just get paid for my sleepless nights.... 1960 VW Bug UBRDUB Walkaround 1st Drag Run Dyno Run Oval Ragster-'57 Rag/'04 Boxster S
|
|
#186
April 26th 2010, 10:32
|
||||
|
||||
|
Quote:
 Quote:
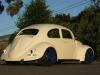
Pics of the new wheels.     It was beautiful out today so I did a walk around video. http://www.youtube.com/watch?v=yXWytmDrrGg I got lots done. Doesn't feel like it cause I had to run back and forth and there's really not a lot to show for the time I put in. Got the new wheels rockin', obviously, did a quick eye ball alignment cause it was more obvious it was our with the new wheels, sealed seams in engine bay, sealed seams under car, inside wheel wells, ground out and redid a couple weld on the cage just to be sure, bolted in the gas tank, got some deck lid stand off's to see how they'd fit and work, fabricated and sealed up the tank filler neck holder, and test drove the car.    I couldn't resist test driving the car some with the new wheels and having the stand-offs. Great day for that. I made a little video. http://www.youtube.com/watch?v=R0lERkAIRIM Was still lots of fun, scary, and I got the chance to break the engine in a little and to try out the 2" carb spacer. Didn't seem to affect the torque a whole lot. Still lights em up easy peasy.
|
|
#187
May 3rd 2010, 11:35
|
||||
|
||||
|
Trying to wrap up fabrication so I can start body work and get paint down.
Welded in the seat mounts.  Here are the seats bolted in. Nothing super fancy, but they'll get the job done. I do have covers for them which I'll put in after paint.  I put down a second coat of Master Series on all the bare steel before welding up the rear fire wall. You can see the center section sitting there waiting to be welded in.  Center section tacked in and making a pattern for the left and right sides. All I had to do was that one pattern which worked for both sides. I overlapped the left and right steel steel sections to make the rear fire wall stiffer.  Here's all the pieces in. I still have to finish welding it up but it's in there.  Now I'm down to just adding some finishing touches. Things to do to move onto body work and paint! 1) Finish welding rear firewall. 2) Patches for the front of the heater channels 3) Line the hood scoop cut out with 1" steel to make the center of the hood more rigid. 4) Seal up rear fire wall and heater channel patch seams. 5) Battery mount. Still thinking about where to put it. I think I can see the light at the end of the tunnel! This past week I got insurance on the bug too. Very exciting getting close to finishing.
|
|
#188
May 4th 2010, 12:11
|
||||
|
||||
|
Here's another shot of the rear "fire wall". Did some more welding last night, but ran out of wire. Gotta slowly weld it up so it doesn't warp to crap.
 On a side note, here's my collection of "Summit Racing's" line of paint and tools to get the job done. Being I'm on a tight budget, I plan to paint the car myself and having heard good things about it, I decided to give it a try. For $400, what can go wrong painting your first car. ;D  I have...
The rest is their activators, hardeners, surface wash, and wax / grease remover. I also have a quart of Master Series chassis coating for the engine bay and for under the deck lid. Here's a recent article about the paint. If that chick can do it, I can. And yes, the chick in the picture actually painted the car. Read the article. ;D http://www.popularhotrodding.com/tec...ing_paint.html 
|
|
#189
May 4th 2010, 12:12
|
||||
|
||||
|
Here's another shot of the rear "fire wall". Did some more welding last night, but ran out of wire. Gotta slowly weld it up so it doesn't warp to crap.
On a side note, here's my collection of "Summit Racing's" line of paint and tools to get the job done. Being I'm on a tight budget, I plan to paint the car myself and having heard good things about it, I decided to give it a try. For $400, what can go wrong painting your first car. ;D I have...
The rest is their activators, hardeners, surface wash, and wax / grease remover. I also have a quart of Master Series chassis coating for the engine bay and for under the deck lid. Here's a recent article about the paint. If that chick can do it, I can. And yes, the chick in the picture actually painted the car. Read the article. ;D http://www.popularhotrodding.com/tec...ing_paint.html
|
|
#190
May 5th 2010, 10:59
|
||||
|
||||
|
Finished welding the rear firewall, sealed it up, and put down a coat of Master Series. I just need to put down another coat of Master Series to make sure it's all nice and sealed.
 Now I just need to button up little things and it'll be ready for body work and paint!
|
|
#191
May 10th 2010, 11:07
|
||||
|
||||
|
Al....most....there...
I got a couple milestone's accomplished. My time was cut short this Saturday when my Husky decided to dig his way out of the backyard. ") I drove all over the neighborhood looking for him just to come home to a muddy Husky right across from my house. I don't know where the mud was at. All the dirt around is dry. I guess that's what Huskies do best. Find mud...and escape. I drove all over the neighborhood looking for him just to come home to a muddy Husky right across from my house. I don't know where the mud was at. All the dirt around is dry. I guess that's what Huskies do best. Find mud...and escape. Any who, I finally made up my mind and made an alternator bracket which I think came out really well. I basically took the low mount bracket I bought and cut it up and welded it to the frame. Easier said than done. The alternator does have full range of adjustment, so I'm happy. Now I just have to buy another belt.   I also bought a new more manageable size battery and relocated it to the back. I made an frame try for it. The plan was to bolt it in above the exhaust on the passenger side to help distribute weight, but that didn't happen. I wound up welding the tray in on the driver's side for ease of access.   I'm also having to rewire / reroute everything through the interior of the car. No biggie, but just another thing I have to add to my list of TTD before I can get to body work. Just a couple more things to do before the next stage.
I'll post pics of the battery setup soon.
|
|
#193
May 11th 2010, 16:28
|
||||
|
||||
|
Quote:
|
|
#194
May 12th 2010, 07:46
|
||||
|
||||
|
I must agree with Jonnyvee on this one. Irrespective of whether the engine is solidly mounted there will be differential movement between the inner wing and the engine such that you will strain the waterpump and alternator bearings. Even if it were spring mounted the spring tension required to maintain a fan belt tension would still strain the bearings. Apart from that I can't see that the sheet metal would last very long with all the vibration going through a directly welded mount - it'll rip itself apart with fatigue fractures.
Clive
|
|
#195
May 13th 2010, 20:45
|
||||
|
||||
|
__________________
If I could just get paid for my sleepless nights.... 1960 VW Bug UBRDUB Walkaround 1st Drag Run Dyno Run Oval Ragster-'57 Rag/'04 Boxster S
|
 |
| Currently Active Users Viewing This Thread: 1 (0 members and 1 guests) | |
|
|


 what happens when the engine flexes
 Linear Mode

