
|
|
#151
 October 3rd 2005, 13:42
|
||||
|
||||
|
Madness..
Should look Way Killer when your finished.. I like the Idea of lighting the distro block.. that should look sick.. Take'n your time is what gets you a car like yours.. Very nice man cant wait to see it on the cover of Volksworld,Hot VW,ext ext... Peace Troy
__________________
SOLD!! 65 Bug 1835cc,Duel Dell 34's,BMD Serp Belt, A1 Perf. Sidewinder,CompeUfire Pointless Ign 95A Alt,CSP Valve Covers,Randar Diego 16's Soon [URL=http://www.cardomain.com/id/troy_audio] 
|
|
#152
October 9th 2005, 05:30
|
||||
|
||||
|
today the f/g work started finally on the upper tier. The skeleton pieces were hot glued in place and then fabric stretched over...couple coats of resin were applied to stiffed it all up to get ready for the f/g matt (this week some time).
|
|
#153
October 12th 2005, 06:24
|
||||
|
||||
|
All the images I had attached were down for quite some time, but finally the gallery is back up and running again (although because the links have changed the images still won't be visible in this thread) - but here is the new link to see all the pics from start to finish (well almost finished):
http://www.manxgallery.org/gallery/album95?page=1
|
|
#154
October 15th 2005, 23:08
|
||||
|
||||
|
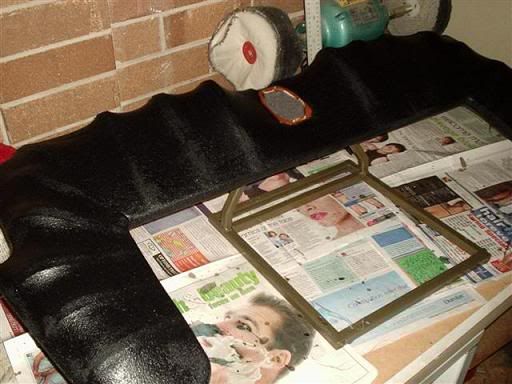
Slowly but surely the amp rack progress continues. When painting fibreglass (rather than carpeting or vinyling it), a lot more time has to be spent to get it spot on.
There have been about 8 layers (most of which gets sanded off) of filler applied to get the desired shape. Lots of sanding thats for sure! Hopefully will have it high build primer then colour soon.   
|
|
#155
October 16th 2005, 04:42
|
||||
|
||||
|
Well I pulled my finger out and shot a couple coats of high build primer this arvo. Overall pretty happy with the prep - only a couple of areas that will need a bit of glaze putty. Took ages to sand between the ribs on the hinged cover piece - pain in the ar$e but should be worth it once it is finally finished!
 
|
|
#156
October 25th 2005, 07:21
|
||||
|
||||
|
Well, finally got a few more coats of high build primer with lots of sanding and more glaze filler (to fill sanding scratches) in between. Then came the base coat (three coats - first light, second medium and final dust coat to lay the metallic down evenly):
 Then two coats of clear (both medium - wet on wet) - wanted to try and obtain some decent flow to avoid having to colour sand it all. Turned out pretty well although pics don't do it real justice.  
|
|
#157
October 25th 2005, 08:18
|
||||
|
||||
|
Shaking my head in disbelief!
As always, SUPERB craftsmanship! Keep up the good work. Sam C
__________________
1973 1303 (super beetle) in Jaguar British racing green, Raby 2270, B spec gearbox, Lots of carbon fibre, Wolfrace Octane Black 17x7.5, Goodyear Eagle F1's, Kerscher suspension front and rear, kamei airdam in carbon, corbeau seats, momo millunium steering wheel. CDT eurosport 6.5 front speakers, IDMAX 12D2 sub, rockford old school amps.
|
|
#158
November 1st 2005, 08:50
|
||||
|
||||
|
Cheers Sam - I'm lovin the progress on your car too!
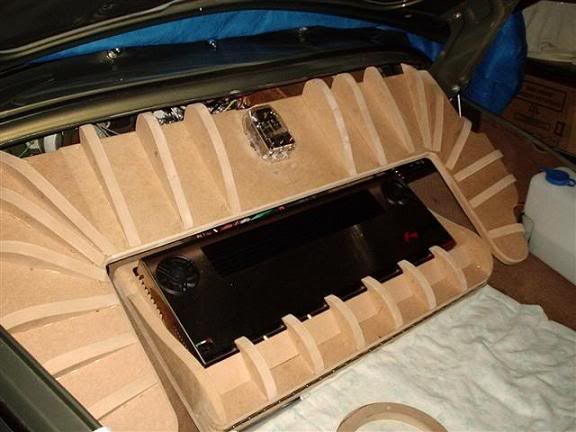
Well finally the painted amp rack/cover tier is bolted in place - four M8 S/S button head bolts holds the upper tier frame in place....and the lower rack is screwed onto the MDF support blocks. The rack was designed so that I could access the fuses easily and amp controls...also with four screws the lower amp rack comes out easily to access wiring underneath. I would have liked to incorporate some vinyl into the upper tier but didn't have any to match the interior, nor the time to modify it further. Ran out of time tonight to get the system running (just have to crimp the last 4 gauge power/ground connections....then hopefully it will fire to life to blow off the cobwebs!  Depending on the light/flash, the colour takes quite a different appearance. 
|
|
#159
November 1st 2005, 08:50
|
||||
|
||||
|
Like any install there are some things I would have done differently, but hey, thats learning....hindsight is a wonderful thing....still turned out pretty well (in my opinion)
 The neons backlight the upper tier (all are fused of course and switched).  The cutout in the upper tier allows backlighting of the distro block as well - and just in case anyone asks, the middle fuse is just there because it looked funny with just two...also its there handy in case either of the other two blow. 
|
|
#160
November 8th 2005, 01:33
|
||||
|
||||
|
Have you heard it yet? Does the interior need some sound deadening?
Absolutely awesome mate! Jason
__________________
If I could just get paid for my sleepless nights.... 1960 VW Bug UBRDUB Walkaround 1st Drag Run Dyno Run Oval Ragster-'57 Rag/'04 Boxster S
|
|
#162
November 8th 2005, 07:48
|
||||
|
||||
|
Yeah it has finally been fired up! The dyns certainly have lived up to expectations - they go damn loud and still maintain their sound quality very well. I put heaps of sound deadening in during the install (dynamat and stinger roadkill) so that has worked quite effectively - still have to fine tune the amp and HU settings though.
Pity when the type IV roars to life, the exhaust note along with the noisy holley blue pump overshadow the sweet sounds....but I guess the exhaust is kinda a sweet sound anyway!
|
|
#163
November 8th 2005, 18:52
|
||||
|
||||
|
you have way more patients than myself. the big reason i could never be a body and paint guy. top notch work as usual. you have one unique car. i would love to see a feature article on the site about it. if interested, start pulling together the info and pics and get with me to get it posted. i can assist with editing.
__________________
zen '73 2316 TIV GL Standard Bug (quasi) Company Branding, Graphic Design, and Web Services at DigiVinci Design
|
|
#164
November 22nd 2005, 18:53
|
||||
|
||||
|
Cheers thanks Zen, sorry for the late reply - haven't been online as much lately. I have all the info in a word document (had to do a big spec write up for an upcoming magazine feature) - also I have a link to the website where all my pics are loaded. I'd love to see it up on here as a feature article! If you'd like the tech info, let me know your email address.
http://www.manxgallery.org/gallery/album95 Thanks Alan
|
|
#165
November 29th 2005, 23:38
|
||||
|
||||
|
Hey Alan,
Are we done yet? How many little details are left? It's so awesome to go through the process on the Manx page from start to finish. I can't imagine how many thousands of hours went into it. Where did you get your windshield washer container from? Does it have a built in pump, or is that separate? I have one from an old Subaru right now, but that looks pretty trick. Jason
__________________
If I could just get paid for my sleepless nights.... 1960 VW Bug UBRDUB Walkaround 1st Drag Run Dyno Run Oval Ragster-'57 Rag/'04 Boxster S
|
 |
| Currently Active Users Viewing This Thread: 1 (0 members and 1 guests) | |
| Thread Tools | |
| Display Modes | |
|
|


 Linear Mode

